Glock Prepping your Frame and Slide to Maximize Johnny's Kits
TRANSCRIPT | Video Link
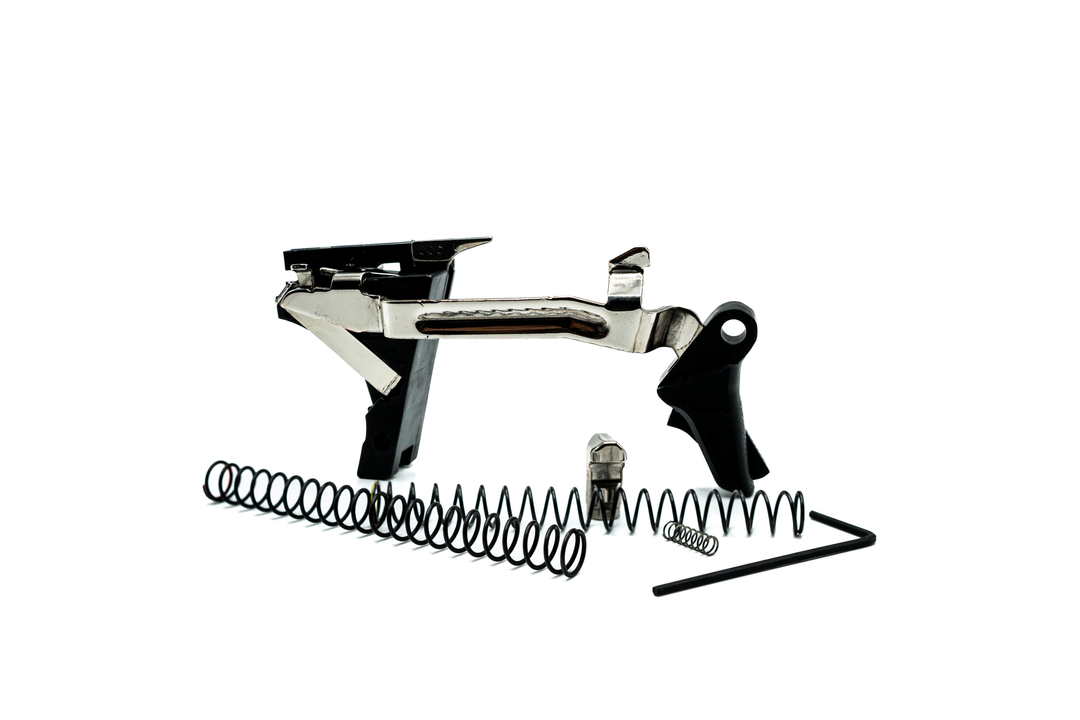
Hey everyone, this is Johnny from Johnny Custom Glocks and I want to shoot a video today on things you can do with your gun to enhance the trigger system, whether it's the combat carry that you've got, the target range, or the competition trigger. I know they're all high-end, high-grade triggers but they're in order to get them to really, really run to their maximum, there’s a lot of little tricks of the trade that you can do to your frame and to your slide to maximize efficiency.
So I'm going to get my face out of here and kind of bring you down to the table because I want you to be able to see more of what's going on here with the gun. Yeah, take you on like this.
Now the reason I picked this Gen 4, because as soon as I pop out the trigger, you can see right here on the bar there is sort of a rubbing, friction point that it is distinguished by those marks right there on the outside of the bar. And the reason we're getting those is because inside of the gun, there it is right there; you can see it. There is a polymer outcropping that is right here.
I'm really going to bring that in so you can see it. That right there. And there's also three other corresponding ones. These three right here. You can see there's wear on those as well. I haven't really done anything to this gun yet cause it's a brand-new Gen 4. It's the you know, it's these new ones that they came out with the flat dark earth, the whole thing, the whole guns that, pretty cool.
But anyway, these three pieces of polymer need to be worked out a little bit. And when I say worked out, what I basically mean is you're going to take your Dremel probably at about 15,000, and I'm going to use, you know, one of my smaller dremels like this. It's felt, for this type of application I really like to use this Polish. For some reason it's like flitzs green version, but it really does an awesome, awesome job on polymer, especially the Glock polymer. Some polymers that don't do the greatest job. For some reason, man, this polymer really, really works well with this type of Polish.
02:37
And so basically what I would do, and I'm not going to go through it all right here, but I would get this spinning and I would get a right in here and I would be taking these areas, all these areas in here smooth, not, I don’t mean smooth, let me correct myself there. The theory is that if one, if two surfaces are sliding off against one another, if one of them is slightly rounded, there'll be less drag and less friction. So all I really want to do here is when I come up against these parts, I'm just really trying to, can’t use the word smooth. And I don't mean to say that, but I just kind of want to get them nice. I want them to feel smooth. But what I'm trying to say is I don't want you to smooth it out so there aren't any, cause that's just as bad. If you take too much polymer off of there, then you're not going to have this bar sandwiched against there, which gives you, you know, back tension against the connector. So you know, too much is bad. You really have to just gingerly go about it. And so what you're trying to do is just put a round edge on either side and leave the, and you can also see the gun, the gun is showing me where the work needs done right there. My point right here and it is right there. Right there. Yeah. Like I said, back in here where this is and if I really get you up in there, you can see how there's rubbing even on where there isn't polymer, where there isn't those outcroppings. So this gun could definitely use some TLC in that area as far as the frame is concerned.
You know, not too many times have I ever seen inside. Sometimes in here there's a glitch or something like that where the trigger is you know, the area isn't cutaway tight enough or something like that. Of course, always check your pins. I'll take care of the trigger. I mean, it doesn't matter if you did a 25-cent trigger job or whatever, it's fine. I'm just saying you know, of course it's a Johnny custom Glocks video. So you know, promoting my trigger that goes in the gun.
04:57
So basically if you did get the trigger from me, you know, it's spot on. I have done my, you know, I’ve taken care of my side of the street and you know, we really want to make sure we're getting it to maximize. So those are the kind of major things in the frame. And like I said, if you really take a look at it, the frame will guide you and kind of tell you where you need to work it. Okay.
Next is the slide and everyone knows, I just wanted to say something. You know, this side of the transfer bar is what actually rubs up against the polymer. And that's why, you know, there was a video where there everyone, and I usually put Gen 4 bars in all my kits and everyone's like, why do you do that? You know, because everyone saw that video about this dimple right here. And the reality is they have been using this in the big guns for the longest time. It's not anything new. Metal on metal is a lot sleeker than hitting three pieces of polymer, right, that was the design of this whole thing. So those three pieces of polymer right there and you can see this is a Gen 4 gun, so it's really not working that great.
But basically what you have to remember is the gentleman that did that video, he probably did have a very, he probably had too much material here. That doesn't mean that every single you know Glock is going to need this shaved down or removed. I've just found, you know, the Gen 4 bars, the actual you know, this end of the cruciform here, the sear is actually a little bit longer, which is why you know, the Gen 4's have a, you know, at the end of the day I can get a Gen 4 to respond a lot more. Have a lot more responsiveness than a Gen T3. I think the Gen 4 slide to frame finishes are, are superior to the Gen 3. There's a lot of slop in the Gen 3's, in some of the guns. The Gen 4's, you don't see that as much.
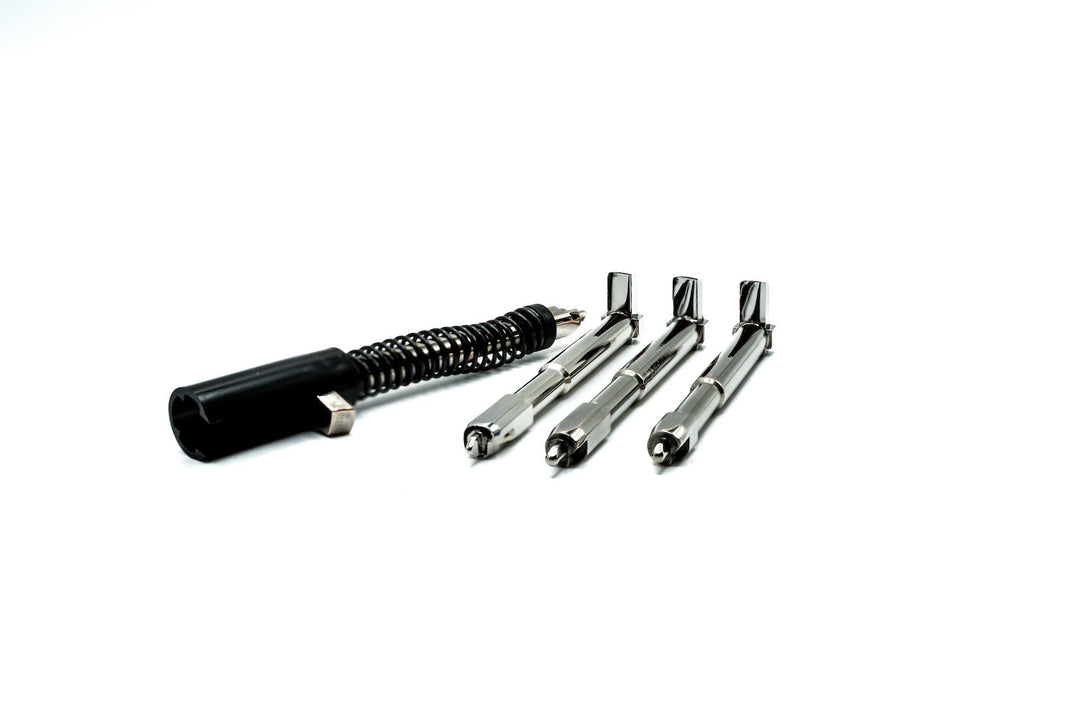
But like I said, you know, just because you see a video doesn't mean every single gun is going to be that way. Like I said, trust the proof of the pudding. When I open this up and there's marks on here and then I know it needs work. If I am having an issue where I can feel this thing grappling and sliding off there, then it needs work. So, same thing with this, with the safety plug, with the firing channel. Oh that's wild. My channel came right out. See so that needs to be addressed. This should not just come out like that, really shouldn't. So I have a tool for that. Actually I spent the money to get the tool since I work so much on these guns. But the main thing here is, you know, you always want to make sure that these cups are not seated where, the spring has a definite end to it, which is right…. Trying to find that for you. Okay see the end of the spring, right there, you do not want it to look like, and this is the best way to show you is how we don't want it to look.
08:19
If I could just find the split. We don't want it to look like this. Back it out. Bring it in. Can you see now how it's offsetting the two cups? The end of that spring is right where the cups separate, where the two cups meet. That is going to cause a big headache for you. In a lot of different ways. You'd be scratching your head when you're like, “my gun doing such weird stuff”. But it usually can come from something like this. So you have make sure these are seated right and the spring is not on where those two cups, where those two cups come together. Sorry about the focus on this. Again, on the side here, you can see there's a little wear there. There's some videos that say, just do that immediately. That's not a good idea. If you just do it immediately, they're going to have a striker that rattles like hell in your gun. But as you can see right there, there's a little mark, which means I want to pay a little bit of attention to it.
Also, I think this is a work striker of mine. No, it's not. I'm going to see if I can get really close up with this. I have to steady my hand. Okay. See the tooling lines on there. They're going around in a circle and you can even see the marks right here. That could cause, this is a major, major point of engagement. And I had a video where I was going to show you how to work on it, but I had some veterans of mine telling me not to do it because people might be acting a fool. So I decided not to do it. But the reality is you really want to get this area as smooth as possible. Even if you get those tooling marks out, all it really takes is 1000 or 2000 grit sandpaper.
And then just really hit it with this, you know, hit it with this dremel tool, you know, with some Flitz or mother's magic or something like that right here. And I mean, it's going to be, it's going to be marble man. It's going to be glass on glass.
10:25
Another thing, with this is, the reason this is angled up like this is, because I told you if one leading edge is actually, has a little angle or bevel to it, it glides easier. So when this, so when the system, I'm trying to see if I can do it any easier way. So as this is running up here, this is running up the channel here on the sear grabs it again, it has a little bit of an angle, so it gets picked up. Also this, if you really want to tighten your gun up at the end of the day and you've got it to, you know, really dialed in and you're going to take down those last few little moments of travel. This is the area you want to take off right here, and make this flat, but not too flat. I'm telling you go two or three stone things at a time. Really if you take it to about right there, right about there in Gen 3's. See, Gen 3's and Gen 4's are different. Gen 4's really don’t need it. The Gen 3’s really could use a little bit of this, of this taken off. You know, of course you're just going to get a stone or whatever and you're going to go, you know you're going to go across the top like this, keeping it flat cause that's going to cause your break. Because when this sear comes off it, right here, it's going to, that's your major engagement right there. The sear comes off and you just boom right there.
12:10
So with the slide, you want to make sure that this channel is totally cleaned out. So you're going to use some Q tips. You want to make sure everything's out of there. You can put the slightest, littlest bit of gun oil on the spring. The slightest little bit, right on the actual spring cups as well. Also with the safety plunger, you're going to double check that and make sure that port is free from any debris. So inside of here, I'm going to go down in there and clean it all out. You know, you want to make sure there's not a bunch of carbon building up and stuff like that.
You know, people that get a little bit more refined parts in their gun and then try to treat it like that bone stock Glock, it's not going to work folks. You know what I mean? Everything's a compromise. You know, that's why I don't have so many bells and whistles on the combat carry version because, you know, it's a different kind of animal there. You know, you want this thing to go bang every time. I remember when I first got my like big $400 XDR derailer on my mountain bike and it was a total pain in the ass to tune in because it was so refined, and I wasn't used to it. But then once I got that dang thing tuned in, oh my God, it just was, it was the most pleasant shifting experience ever. If any of you can relate.
Also just always check your striker bar for mars and dings in this area where the shelves are. Every once in a while, you'll see marks, especially with the strikers that are, that are lightened, that are moving faster. They usually bang up against the safety plunger a lot and you can see those mars and, you know, little dings and stuff taken out of your safety plunger. At that point. You need a new safety plunger. And like I said my system is designed really to... I like Glock. I mean I think the Glock should be kept what it is. So the system was designed around the striker. You're going to get your best bet with my systems with this striker. I'm not saying Yeagers and all those other things aren't going to be good. If you want to use them, you know, you know, have at it. But you know, just know I designed it around this system cause it's a lot easier to keep consistent cause that's the gun it’s going in.
14:36
So those are the two major parts of the slide that you really, really want to take a look at. Also, you know when you are, when you do get the, when you get the gun put back together, like I said, there's that slide to frame fit. When you're testing your trigger. And I know everyone doesn't like magazines in a gun, but put the magazine in the gun, especially if you're taking material off of the Striker. Have the magazine and the gun because that is actually going to lift the rear. Look at that, see that right there, the tolerance, that's going to actually lift this up a little bit. And so therefore you'll be getting a false read if you don't have some kind of, if you don't have some type of upward pressure coming up against there. Right, that. You know, that's going to that's going to definitely, definitely change things up once you get that magazine in there. Not drastically, but just like I said, make sure you get it in there.
Those are basically just a few things that I wanted to show everyone that they can do to the gun themselves. And like I said, just don't do it because someone said it, or one video had said to do it. Even if I said to do it, you're looking for the gun to show you where to work. And like I said, it will be absolutely 100% telltale. It'll show you exactly where the marks are sitting, you know, where to just smooth out the material and there's also like a couple of different waxes you can use here that actually do a pretty good job. You can kind of look into those as well. But yeah, those are the major things, I’ve taken care of the trigger end of it. Now for you guys it's basically these couple things I showed you are really, really, really going to make the difference.
16:36
Also, you know, I just want to say a word or two here about you know, when you guys get the, when you guys get the guns and when you get the trigger. Because I set the tolerance is so tight for these competition triggers. And I am putting them in my donor guns and then going out and shooting them and they work fine. I had a couple that were, I had like one week where there were crazy reset issues with all the triggers that I sent out and I'm just like, what the heck? And so it was just time for me to get a new Gen 3 and once I got another Gen 3, I started recalibrating this new gun. I haven't had a call since. But if you basically are having any type of reset issues, what you want, that means...it resets like this, this is your basically your reset and it sits on the outside of this cruciform and goes, snaps off of there. It's kind of hard to do with, I want to just fake it like that's it. That noise right there. So what happens is, because I'm trying to tune it so quick, this bar is actually resting. The beak of that bar is actually resting. You know right about there. If it's resting down a little bit further, that gun will reset itself because just the violence of the shock of the shot, you know, boom. It'll do that. And so basically what you have to do is you have to, you know, take the rear screw, the rear screw right here and you're going to back it out. You're going to take it backwards, start at a half turn, then shoot the gun again, half turns, shoot the gun again. But you never will have to go more than a full turn. That's basically the way it's done.
18:37
As you can see, the faces of these connectors are even worked. And this guy wants this, right there. You can see just how nice and shine, there we go. See how shiny that thing is. So basically that is a very slick purposed, beveled and angled and rounded and all this other cool stuff that I do to it to get it to really react quickly coming off of this, coming off of that beak. So if you're not in, and it's a matter of, Oh, just a matter of microns that you could really get it to run. And you know, once you really get it in there, lock tight it again. Or like I said, I hate to say this but because it sounds so whatever, but you know, super glue, super glue will not let this system move. It's funny. And then if you want to, if you want to open the system back up, you just soak it in. What is it? Fingernail polish remover, acetone. But most of them are calibrated the way you guys want and when you get them, if you buy it from the store, you might have to work with them a little bit to get them where you want them.
But as you know, I had spent a pretty good time talking on the phone to everyone that I sell triggers to trying to get an idea of what they're doing and what they want. So that's just a few things. That was the only thing I wanted to address was the reset thing. You're just going to back it out a little bit and that will really, really, really take care of just about anything, you know, when it comes to reset, it will clean it all up.
20:06
So thank you for watching. I know it was kind of lengthy as all of them are, but I get into it and I’ll have another video coming out here soon and it's going to be a surprise. So I’ll talk to you soon. www.Johnnyglocks.com and like I said, the name is finally have been chosen. It's Johnny Custom Glocks, and that's what we're going to leave with. You take care.