Glock Striker Mod a la Johnny Custom Glocks EDUCATIONAL ONLY
TRANSCRIPT | Video Link
Hey guys, this is Johnny from Johnny Custom Glock right here. Keeping my face out of this one. Basically these are two guns I just finished that have my competition trigger candidate. This is a Gen 3 with a Lone Wolf aftermarket slide.
The reason I'm showing this video is because I want people to see that this is a 100% intact striker length. The face of it has been worked, which would really mean this part right here where my finger is, you can see that mirror image, Yeah, right there. So basically, I just want to show you that you don't have to take length off a striker to get what you're looking for. So we're up against the wall right here and then look at, this is coming up in a movement, boom. And you can just see how unbelievably short the reset is too. So watch the reset. That's one example.
Here's another 17 long slide I built on a Timberwolf frame, which is really cool as well. My Johnny Glocks competition trigger inside of here. I think this is a really, really cool frame. It comes with a swelled grip too, so you can change the back grips out with the magwell. Same thing here. Striker is in full length, just the face of it has been worked and this is pretty shiny, so I don't know if you're going to be able to distinguish, you know, there we go right there. That's an okay shot. So basically, same thing, slider on, like I said, if you're testing for triggers, you want to have the magazine in there, that's going to give you right frame finish.
Now this is about 2 pounds pull. It's snug up against here. I'm right at the wall. And reset. He wanted a little bit softer reset. So see, I can barely hear it. He wanted a softer reset on this. The gentleman that I’ve built this for.
02:07
So basically that, you know, that's my deal. You know, you come, you call me up and say, Hey, I want this gun. I want 30% pre-travel with you know, like I don't want to be able to feel the reset. I'm shooting off of sandbags and stuff like that. So for him, he wanted this 2 pound trailer that was very short, but with the reset he almost wanted it to be, see that's not, I'm not a fan of that reset. For him, he wanted to stay focused. He didn’t want a lot of movement on his sight. So I created this specific trigger for him. That's what I do.
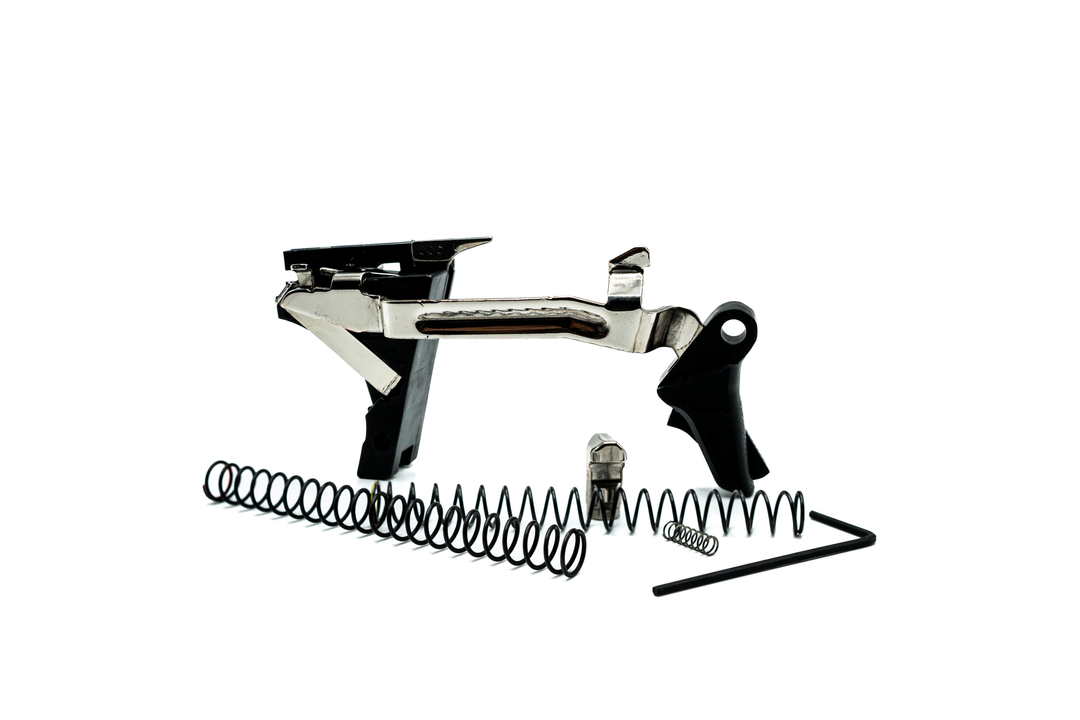
So basically here is a gentleman that took way too much and he sent this to me to check out. That is way too much material off the striker as you can see. This is a normal, this is a regular Striker. As you can see there's a lot of leg left there. That's what you want. But what you don't want is if, and I'm holding this white up because it seems to work better. If you can see the tool-in-lines. Yeah, right there. See my fingers, this Striker face right here, which basically means this needs to be worked out. So you basically, it's a mirror finish. That's what it, that's what it really needs to be. And so I told everyone I’ll be showing them how to do this pretty simply. You have to make sure you have a flat surface to start with. I'm doing this rather quickly too, just so you can get the gist of it. And of course you know you would want it to be, this is the angle you're going for. It's exact angle that the Striker is on, 90 degrees. Very, very light and keep checking your work. Very light.
04:23
This way you can make sure you're staying smooth. I like sandpaper. Everyone says, Oh oil it up really good. I mean you want to oil it, oil it. I'm moving out here cause it's just the way my desk is set up. It has a lift to it so I can do this very easily. A lot of guys like stones. That's 500 [grit], this is a 1000. Should've thought about this better. I'm kind of all standing at a position weird here to do this. You can see the grit is getting a little bit finer now and it's a little bit easier to do. I keep checking for my tool-in-lines.
And actually I might go back to 500 because I didn't really, I'm not seeing what I want to see on this yet. I think it just gives a lift right there. There we go.
Now to the 1000, back to the 1000. And I’ve been doing these. I do so many of these all the time that, you know, it's a matter of feel. That's the thing. And this is like art for me. It's a matter of feeling the whole thing, the way it's angled and all that, I can pretty much pull it off. You might want to set it differently. 1500 okay, so we're at 1500 now.
06:23
Coming out nice. You don't want to be like that. See how I’m angling it that way. You don't want to be over-top. You want to be as flat as possible when you, and now, I thought I had a 2000. Oh here we go. 2000 right here.
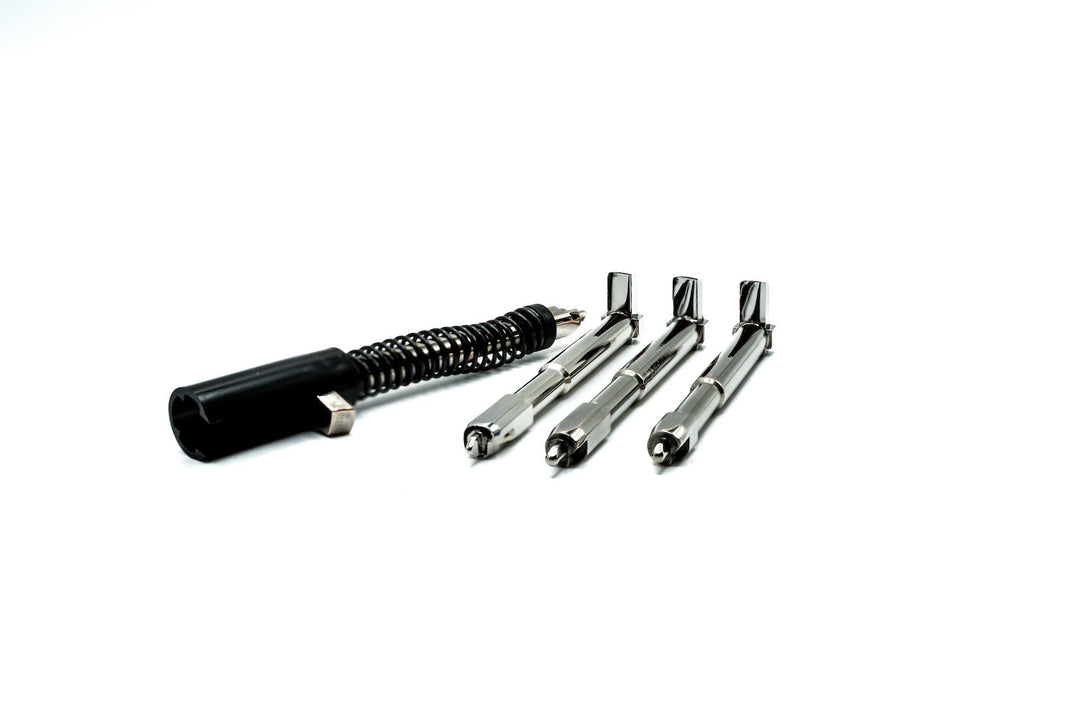
Now I am really going to show you a trick of the trade. This is that spongy kind of, you know stuff for lining. If you put this underneath here, what it's going to do is it's going to give you a little bit of roundedness to it, like almost like a half a moon shape and you would probably start that at about 500 if you want it to. I know my hands are in the way here. That just takes a little bit of the edge off and gives you a round. Then the last thing you're going to do is a little bit of Mother's Magic on there, right. Get a rag here real quick and then this is my favorite dremel tool to do this with, this little felt one right here.
08:12
What you are going to do is, you are just going to watch the face of it. It is kind of impossible to remove metal with a felt thing so you can push, you can put a little bit of heavy handedness on it and so this is it not, I'm going to tell you right now, for me, this is not 100%. I would still have to go back and do a good amount of work for this one. Just trying to show you a quickie about how to do it. But you can see there's a huge difference now, there is a, there we go. There we go. Yeah, there, see it. And it's kind of hard for you to, that's the problem, having a hard time getting an angle on this with you to be able to see it without my fingers being in the way.
So I'm going to grab these, and so there you go. See that? Now, like I said, for me that's still not good enough. It could come down some more, but that's me. But you can see most of the tool-in-lines are gone. I can still see them here, you know, because I have the definition to do it. But I would just do that whole process over again a little bit longer and really paying attention to it. And then that will yield, especially with the Johnny Glock system because the sears on the Johnny Glock system are already brought down to, you know, you can see, that's the sear. I just got to put something white behind here because of the nature of the camera here trying to pick up all kinds of different stuff.
10:12
But the sear, which is, come on, focus, Right there. You can see the sear has been brought to that same, there we go. There's a nice... Especially on the competition, this part right here, this is a major area of contact right here. So I rework all those areas to really, really get those to perform and you know, the way they, yeah, as you can see those areas right there, this is what connects to the connector. You need that to be smooth. That's major engagement as far as, and also with the cruciform right there. And of course the safety plunger, I mean the vertical extension as they call it, right there is another one that has to be mirror. And right here. You know, I use Gen 4 boards on all my stuff, and if I feel there's too much here, I’ll take it off. But you know, like I said in another video, that guy might’ve had a really bad one and so he probably had to take some material off, but that doesn't mean for every single gun.
So basically that is a video on how to, you know, get your striker lug face where you want it, and then that is going to give you this nice break that you've been looking for all your life. Tune in to www.johnnyglocks.com and go to the YouTube channel. There's tons of other videos there for you to check out. Once again, thanks for... Trying to get that here. Thanks for stopping in. You take care, Johnny. Bye bye.