Glock Trigger Safety Modification Part 1 EDUCATIONAL ONLY
TRANSCRIPT | Video Link
Hey YouTube, what's up? It is Johnny Glock here. And this is the first video I put out in a while, just because you know, down here we had that storm Irma and kind of had to flee for a little while just to make sure the kids and family and everything was okay. The store is fine, I'm fine. However, we did have to move around a bit just to skirt the possible, whatever they call cone of projection.
So anyway, it was an adventure, I’ll tell you that. But I'm glad to be back and I'm glad to be you know, taking orders again and not that I ever stopped taking orders. But I'm finally caught up enough now that I can shoot a video here and it's going to be a pretty good one.
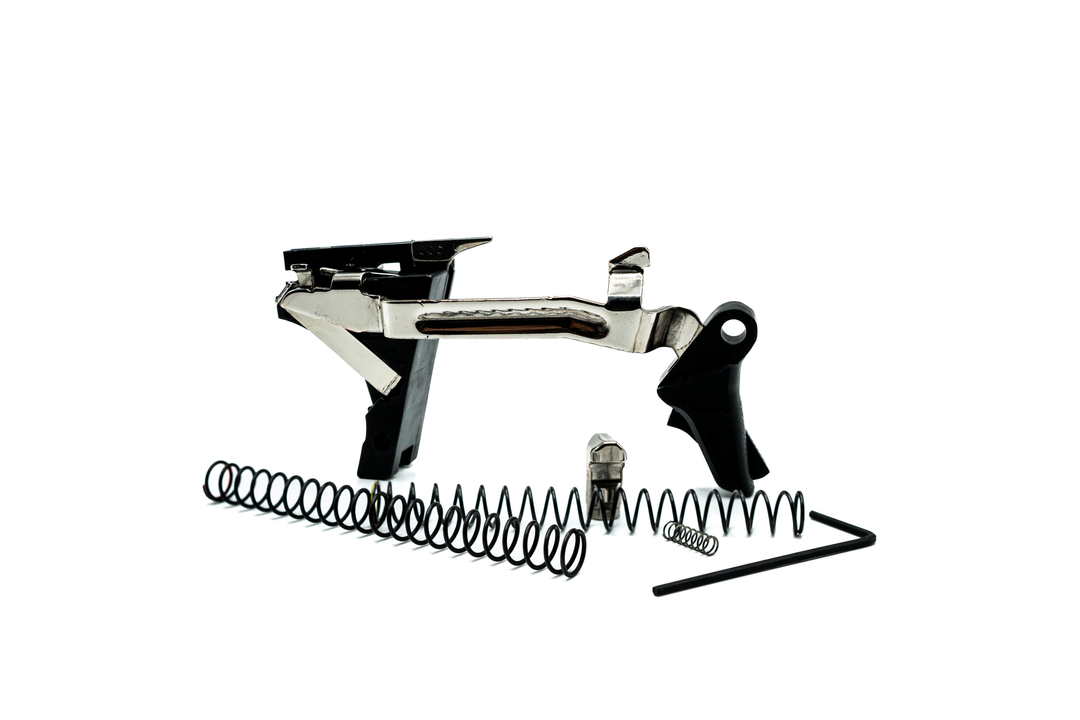
So, and this usually only happens with the bigger guns. So when I say bigger guns, I'm talking 10 millimeter and 45, but the variances in what is the portion of the gun where the safety tab, right, it’s still hard to see there, but you can, the safety trigger tab, it's right back there. This, I really need to start putting these things out before I start, this area right here. And I’ll get it into focus for you. And you can see, look right there, there's like a hair of space right behind there, that's basically really all you want or need.
A lot of the aluminum shoes you'll see have a lot of space there. And that's what kind of, when they fail the, you know, when they fail that test, when they hit it at an angle and they you know, put just wadding in there and it blows off, it's because the momentum before the actual safety trigger tab catches the frame, there's enough momentum to push it down off of the shelf. And what that looks like is this. So you're taking this part and it's sitting back right in there. And we're going to do this. We're going to do this really good sitting back here. So when it pops, it goes down, down into the shelf. Everyone knows the way kind of the Glock works.
02:08
But anyway, I'm going to actually, this time I'm like really good. I'm putting the camera behind me so you can see what I'm doing this way. Cause I'm just, I'm tired of, you know, feeling all goofy and playing with stuff in the mirror image.
So basically with the bigger guns that I leave a lot more material on the striker safety tab because usually there's variances and I have to err on the side of caution.
Now there have been people that have called me and said, Hey, can we take more pre-travel out? I really liked that whole 1911 thing you do. And I said yeah. And I tried to talk them through it, but it's hard to talk someone through this. And also there's a lot of liability when it comes to doing something like this. You know, at this point, the trigger that I built for you is yours. So what you do is on you. I don't want to say it in a jerky way, you know, because everyone knows I take phone calls on Saturday and Sunday and try to walk you guys through stuff.
So basically if it need be, just remember that and be careful, you know what I mean? And that's what I'm going to do. I'm going to show you some things and at the same time I'm going to give you the considerations and the, I wouldn't say compromises, but the counter checks, you know what I mean? If you're going to do this, you have to make sure this is done. If this happens, you have to make sure this happens because that's the way you keep the gun safe. And that's the way I know, if especially when I'm working on someone's gun, it's a different story. You know, if I'm doing a drop in, I kind of find the mean in between a couple of different frames and set screw it there. Or you know, whatever connector I'm using. Or there's a variety of different things that I'm doing with these drop-ins. That's why they're not, like, if we don't do the cookie cutter thing, I would say, I don't do the cookie cutter thing here. I'm building these one off and you know my hands are in every one of them and I'm going to talk a little bit about that as we're going along as well.
04:06
So I'm going to flip this camera now and we'll be able to see what I'm doing right in front of me. And let's hopefully we'll get through this without too much insanity. Alright, there we go. You're going to see this, but you know what the deal, I’ll bring it up a little bit.
Okay, so I use this gun, okay. And you can see where we talked about the trigger safety tab. It is engaging right there. It is not going to go anywhere. Now this is one of those triggers that is very much, now you have to keep it safe; you have to have a little bit of this right here. And this is also the transfer bar, if you feel right there. Well actually I should show everyone, this is clear, that was a comment of a post on, no magazine, on Facebook that, you know, even though I'm used to it and everyone knows that these guns are clear, basically I should show people because it might be their first video. And it's my responsibility and all of our responsibilities to use gun safety at every step of the way.
So we can see there's no nothing in the chamber. It's a clear gun and no magazine. Back to this. So the trigger safety tab is grabbing there. There is no way that is going to disengage unless you disengage it, okay. You can see it moving. We also said there only has to be a small amount. You can see the space in between the back of that and they, I’ve heard the same piece of paper before and that could, that's close. You know, let's put a piece of paper. This is thin paper, but you know, heck, we'll do it anyway.
So a piece of paper back behind here, and you can see a paper fits in there, well, barely. This flimsy paper too, man. Yeah, there we go. Okay. It's in there. It fits right there. But basically, like I said, this is engaging and that is more than enough, especially when I get over the white right there, you can see that that's more than enough space and definitely that piece of paper go through, this is keeping the gun safe, very safe. And that's for the drops and whatnot.
06:27
I have couple of times people call me up and just, you know, oh my God, thank you so much that these are safe. They've dropped them off of their refrigerators at home, you know, ready to go to breakfast with kids in the breakfast area. And you know, of course it stayed safe because I knew it would, but you know, that's a heart pounding situation. So right there. So there's that little bit of, and it's why we're all on the wall here, but there's just a little bit of movement. And then right from this part movement, you have the break and then, and you can see how I do this. I always back my finger here. So you see how short the reset is. There's the reset.
This isn't a particularly loud reset because that's the way I was asked to build it. So that you can see it is a very short reset, especially if you're looking at that pin right there. So break, reset.
And once the first shot is broken, it is basically running like a 1911 because it is pressure. It is pressure that is setting this off. It is not a ton of movement, like pressure sets it off and it has the feeling of pressure even though there is some travel. So what we're going to do is we're going to open up the gun. And what we're looking for here is, and this is why, okay, you know, I always get on other people's sites and read what they have to say. And it is the coolest thing I saw was like Suarez said, you know, we are riding the shelf. They let you know that they are riding the shelf, which means is they are in this area right in here.
08:03
Now, honestly, I’ve worked on a couple of Suarez's. They're not really riding it as much as they say they are. But nonetheless it's sitting about right here. And if you do any trigger work, you know that that's going to hold. But that is contingent upon a bunch of different stuff. The system we just looked at, if you would look above a trigger, and I'm going to show you this. There's this line right here, which is the beginning of the trigger shelf, that is perpendicular to that or parallel, shall I say, parallel. And then when you put the trigger in, not only is it sitting on the shelf on this side, but it will correspondingly be sitting on the shelf on this side, drop shelf drop okay. So with this system, you'll actually be able to see this line on my gun.
And so you can see, you know, and I'm doing this because I really know the counter measures and things like that, that you have to do to keep these safe. So with it even sitting right there, if you know what the heck you're doing, you can do it. But it all is contingent upon this. Okay, this is not going to let you pass. This is not going to let you sit anywhere close to that because of the way it's designed. And even with the stock system, you know you have a ton of room in between this and the frame because the Striker spring is half a pound heavier than the trigger spring. So you have half a pound pushing it forward. That's why there is all that forward movement in the Glock. So there's movement even before the trigger housing hits. And you'll see that too on a lot of the aluminum shoes where there's, like I said before, space in between the frame and this. And that's like I said when it, if you hit it right and you have that momentum and that's where the guy shows the videos with all these triggers failing. And if you have that momentum in a certain way, it's going to just drop down in there and bang. Okay.
10:11
So I’ll show you this one. Trigger safety is like I said, it is engaged and there's that line. We are right on that line, but if I pushed down, it's not going anywhere. It is in a tug of war with the, it's in a tug of war with that safety that's right there. And that is not going to move. So you can see that trigger tab is butted all the way against. If I pull up a little bit, there it goes right there. Let me get down the sheet of white. So there it goes right there. But if I let go of it and then flip it here and you can see I am still completely captured. This is not going to drop and go off. And there's some other things to consider with this as well. And as you can see, you know, this is the only movement we have in the system. You can see the line right there, you can see the line right there. That is the shelf. So this is the only movement we have in the system, but it clips right on there. And I do some stuff to the bar to ensure it's 90, and it's going to hold. But that's all the more movement in the system. That's why when it's put on here, that’s why the stroke is so short and your splits are tightening up and your accuracy is awesome and all that kind of stuff, especially with the [glock] 34.
So there was one more thing I wanted to mention about that. I just thought of it and I just lost it. It will come back to me. But that's basically how you need to think of this. This will actually keep it from dropping off. Even if it's hit, like they hit it on an angle like that and that's designed to throw it back at a 45 and have it slide down the 45 degree angle, you know. The drop safety is actually horizontal, drop safety is made more for horizontal drops and the trigger safety is made for vertical drops. But right in between there is a place where you know, guns can drop, and it needs to be addressed and to keep the trigger safe there are some things you have to do.
12:30
So back to the whole reason when, let's start with this first. So one of the things is if you're using a 3.5 connector right here, you're also, you don't have a lot of wall to hold the trigger bar in place either. So you are going to, it's going to be very easy to just wham, slip off that, See the angle that that has right there is going to be easy to you hit and then slip. Okay. Engagement is what I wanted to get to. So that's one consideration that you have to have if even if you're against the wall, a hard drop could push it down because of this graduated angle. I better back out this so you can see the full mechanism here. Maybe I have one here. All right, give me a second.
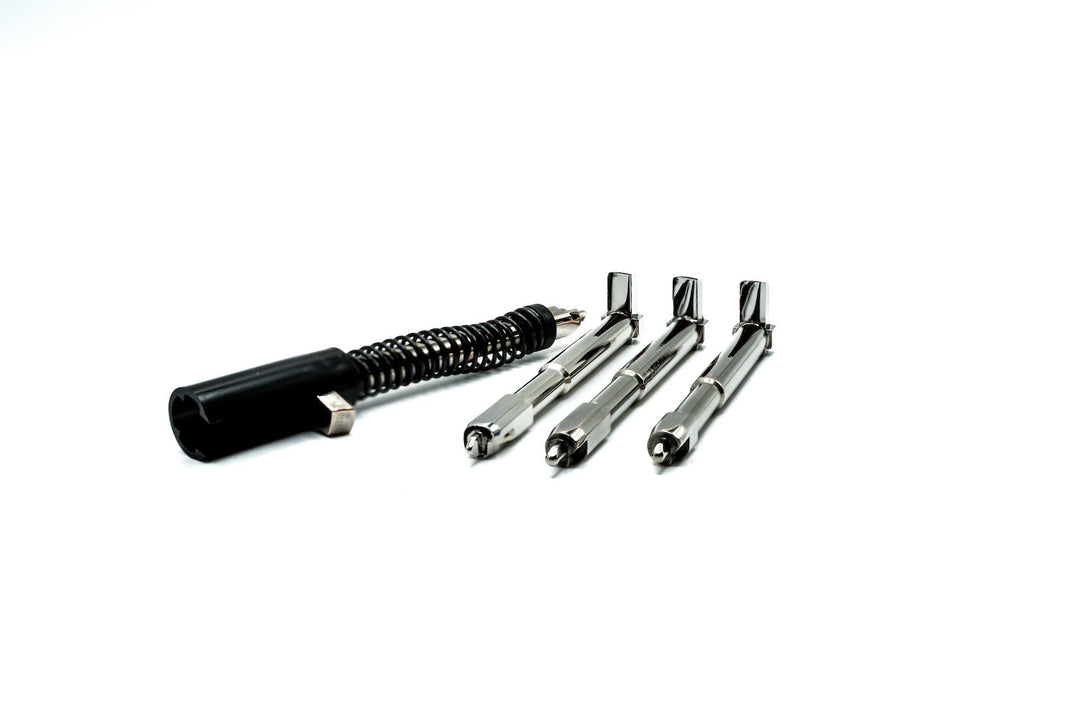
All right, so as you can see from here, there we go. It's very graduated. So you know, a seven, eight-foot drop or seven-foot, six-foot drop, let's say from a seven-foot drop from a refrigerator could go wham and have that thing drop down. If you don't know what you're doing and you don't have, you know, enough engagement. And some of it has to do with the trigger spring and the striker spring as well. And we'll get to that. So I'm going to pop this out so you can actually see the difference. So now I'm going to put a, okay, here's a dot connector. I'm going to grab a standard connector as well.
14:16
So now you can see with the dot connector you have more, it's not as you know, soft going back like that. It's hitting this right here and it's going to really want to use that almost as a stop with the radius. So that's a consideration right there. You have more of a stout wall that is actually going to hold this whole mechanism into place. So the safety, so you will not engage the drop safety right there or disengage the drop safety. So that, and I’ll show you, I’ll try to do it with a one right next to it. That...I'll put these both in here, got this off, real time folks, real time. Let me grab another bar out of here. Okay. So let's just get a visual on this and let me move this crap out of the way. Let's get a visual.
So this is the 3.5 connector. So as you can see, it's coming back and it's hitting this and it's going to hit it like that before it drives it down. It's going to hit it like that before it drives down. Now here's the Lone Wolf connector. And as you can see, it's a totally different, I'm not really even getting much of a wall there. It's really just drop, drop. Now if we pop this out and put a standard connector in here and see this is the difference of like, you know, building tactical triggers, you know, like you have to know these aspects of it. If you're going to push thresholds, man, you better know what the hell you're doing, even in your own gun. And I’ll take your calls anytime. So even with this, you have even more, you have even more of a, wait a minute. Let me double check this to make sure it's a, yeah, standard. Seemed a little odd right there. It was a minus hanging out.
16:24
So even here with this, you have that stop. Okay. That's the 4.5 pound connector, which everyone calls the 3.5 pound connector, but it's actually a 4.5 pound connector. And then I’ll push the dot through this one. Here's the dot. Actually, I like the way I use the dot connector a lot. I like the, this looks more like the healthiest kind of stop, you know, right there. I love the dot connector for so many different reasons. It's kind of right in the middle of everything and then drop. It drops quickly and it also resets, you know, this is your reset happening right here. So that's why the 3.5 connector resets quicker. Because say you're sitting here, you have to come all the way in front of that. The radius has to come all the way back. Okay and then with the, with this thing, look at all the reset has to come forward here. That's why the resets on the stock Glocks are so long.
But once again with this angle, it's stopping it, stopping it pretty well too. On 3.5, I’ll slap that in there so you can just get a visual of what I'm talking about with reset. Make sure the stops out of there. I think it might have flown over here, okay. But the 3.5 reset, you can see right here, this is all the way back. This is all the way back to the, you know, back to the wall right there. That's why the 3.5 reset is happening.
18:07
Right. Safety is harder to get on as my stops coming out a little bit right there and then it's reset. That's how I can get them reset quicker. So that's one consideration. The angle of the connector. Now you also have to remember with engagement, I’ve got to go grab something for you.
So this has the Armorer's back plate in it. And you cannot, this is one of my triggers, you cannot see the sear. It is covered up by the striker lug face. But once we start to move, you'll see it slip down and out. Okay. There it is. So, if I have 100% engagement right there, that's another thing that if this falls, if this drops, the engagement itself, because it is so solid there and it's not like a, you know, I’ve shown you on other videos where Glock allows like a quarter of its sticking out. But with this you can see it a 100% engaged. So if there is a drop, it is not going to, this thing isn't going to be hanging along by, let me pull this so you can start to see a little bit. I'll try to, I’ll try and go just, okay. Oh yeah. See I can't even do it because the design of the trigger is different and there's some modifications I'm making it that aren't going to allow it to happen. But even though it's 100% engaged, right, maybe right there is where Glock will allow. But if it was just hanging on by a thread like that and it dropped, you are going to have an issue, especially with a 3.5 connector in correspondence to bad engagement. Okay. Those are considerations you have to have. Let's see what the movement is in this system too.
19:56
So once again, there's your, there's your line, you're coming right up on it and it backs off. Okay, so that's the trigger safety tab engaging right there. Let's get that so we can see possibly, yeah right there. So there's a trigger safety tab engaging. And then right here, if I pushed down, it's not moving. You know, it's not going to move cause it's on that, it's actually on that angle right there and it's being held forward. I use that. This is the other consideration. So you have connector engagement. And also, like I said, I advocate the 5.0 pound spring, I like the 5.0 pound spring is it’s going to give you a speedy reset.
So basically with the speedy reset if you match the striker spring up, Four and a half to five, you're going to have a lot of tension between this part and this part. It's going to be a good counter tension. Now, just like the stock configuration that has a half pound heavier, that has the, you use a half pound, it's not going to be as stout as that. But like I said, we're trying to lighten it, enhance the trigger so it's going to be differently. So this butting against here with engagement with five pounds going this way and four and a half coming back there, you have a nice solid meeting of those two pieces. So full engagement and the fact that you don't have, that you do have like a balance spring, what some people will do is they'll put that 6.0 pounds spring in here and the 4.0 pound spring in the striker. So as far as the 4.0-pound is pushing back only so much the trigger, the trigger spring is pulling forward. Even though the tension is there, it’s a different type of mechanism that makes it not as, there's just not as much pressure against those two points.
So let's say this is the sear coming up against the striker lug face and when this sear drops down, it comes forward. If you have all that forward tension this way and you don't have a counter tension this way, it's going to have a lot. It's going to be a lot easier. That's why when you put your 4.0 pound spring and then the break starts to go, chink. Break feels very even for a tactical trigger that I would build that has a glass rod, the breaks going to start to feel rolling cause you don't have any real, pressure on this striker lug face.
22:26
So it starts, that's why I tell people you might like the 3.0 pound trigger. Everyone wants a 2.5 or two and a quarter. And you can create that even a two with a, you know, with the 4.0 pound spring. And that's another thing they mess around with. They say, okay a 2.0 pound springs because it gives you a 2.0 yield. That 2.0 pound spring is actually a 4.0 pound spring right around there. And so that's considerations, the engagement, the connector and the springs all working in unison.
All right. Now there is another way to do all this and this is a little trick. I know I'm not showing you all of it, but....