Glock Pre-Travel Reduction Part 1 EDUCATIONAL ONLY
TRANSCRIPT | Video Link
Alright. Alright. Hey guys, what's up Johnny Glock here.
First of all, I’d like to apologize for the long hiatus that I’ve had. I got so many inquiries like, hey, are you okay? Did you cut your hand off or fall off a building or something like that? But so I appreciate it. I appreciate the concern, but no, I’m alive and trucking. I've just been busy as heck. And I don't know, I’ve told a couple of you people, you know a couple of guys when you've contacted me, you know, Jonathan is no longer with me. And that was part of the issue that right before Black Friday, this happened, and I had to let him go. And so I have been completely, completely inundated since that point. But you know, stuff happens and something great has happened. Now that I got a new guy, his name's Jake and he is working out phenomenally. He's right over there painting springs right now. So you'll get to meet him a little bit later in the videos and stuff like that.
But yeah, so I’m back on track, let's put it that way. And because of that, I have a spare moment here to, you know, come up out from under water and do a video for you guys. This is a video I had it up before, but you know how YouTube is, they take stuff down that they deem whatever, you know, I’m not going to get into that whole thing.
But nonetheless it was up and it's something that everyone always asks for. It's like, how do you limit pre-travel and there was a way that I showed how to limit pre-travel safely. With the fixed kind of post position and that's what we're going to do today and it's going to be a lot more detailed than before because now I have like a dry erase board. I'm trying something new. I'm sure my camera work won't be any better, but you know, I got this dry erase board that I can draw stuff on. Try to show you exactly what I’m doing, if I really can't get stuff in focus the way I want it to. So yeah, that's about it. I'm going to shut up here, at least this interaction and bring it down and you know, let's get started. So I’ll get this camera come down here. We’ve all been through this one before. Just till we get the position correct. It's going to take a little bit of finagling, good lord, not again guys. All right. That's going to be fine.
02:25
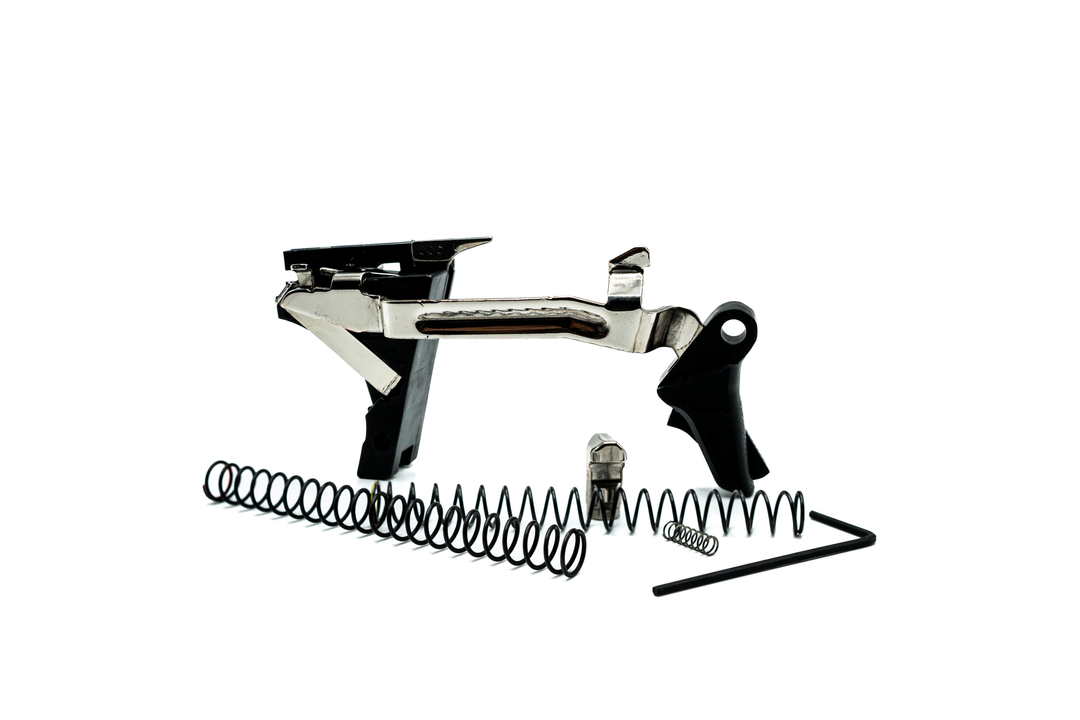
So basically, I have one that's done here somewhere. I’ll find it or maybe, I don't. I just did one. Good lord. Here it is. Here it is. Okay. So this is what you're looking at. It's this post right here. I'm going to kill this light just so we don't get a lot of blur. I mean a lot of glare, but it's this post that is right here. And what that does is it limits the pre-travel. So you are limiting it, but you're not of course off the drop safety shelf right there. So what I’m going to do, I’m going to move some of this stuff, but this is what you're going to need, and this is what I showed you before.
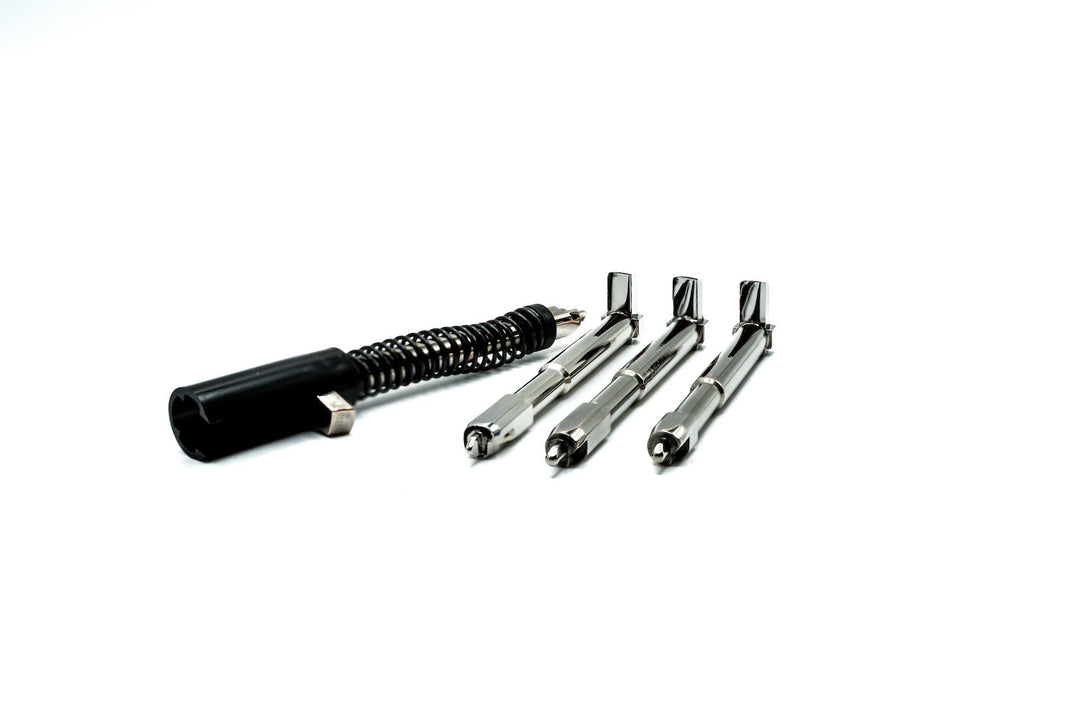
You're going to need a punch. You can use a drill. I have these pin vises right here that are pretty cool. You know, they come with a bunch of different you know, inserts like this that you can put different drill bits into them or whatever you're wanting to do, but it's called a pin vise. Whether you want to put in a tool or something like that. But this is a 116th drill bit right here. This is a 116, these are 116th roll punches in here. Set these to the side. This is the punch of course.
And then you need the housing and now I’m going to show you some different things with the bar and all that as well. So let me get this dry erase board and see if this, actually, this format can actually work right here. So no, wait, I’m just going to draw a picture of the shelf. I know this is backwards, so hopefully I drew it correctly here. If not, you guys are going to have to be smart.
04:17
So this is basically, this is, you know, where the cruciform perpendicular bars of the cruciform are on there. If it goes past that and it's kind of sitting in this area and you have a horizontal drop, this can drop all the way down into this area. Thereby having the cruciform kick up, which is right here, drop off the sear lug face and then bang. Okay, so I hope that's making sense to you all.
In the one I showed you. The post was kind of like right in this area. Now if you do it right about there, you're not going to have to modify say shoes like Overwatch Precision or you know, SSVI, who are some of the other ones? Oh, there's another one, Apex [Tactical], things like that. So the more conservative you are with where you put this, the less work you have to do later on down the line. Now, if you're trying to really push the threshold, you know you're going to and you want to put it here and you want to have the, you know, at least you want at least a third of this on the shelf. Okay. So you don't want more than that off of there. There's instances if you really, really, really know what you're doing, you can push that. But for all intents and purposes for you guys, I wouldn't go much further than having 1/3 of this parallel, perpendicular bar rather, which is this part right here off that shelf. Okay. Cause you're going to run into potential problems. And then when you do this modification too, other ones have to follow with it, if you are going to push the threshold of this.
06:01
So that's basically the explanation of you know, of what we're attempting to do here. And I’m going to erase this real quick here. Looks like I might be a little better.
I had these ready because I knew I might run into this. It's all about preparation. So the other thing that you're going, because we're going to go through all these modifications first. The other thing that you're going to have to modify if you limit pre-travel is your trigger safety tab. Because what's going to happen is the trigger safety tab with this much meat on it right here. Let me get this, with all of this right here, it's not going to want to pop out of the frame. So you are going to have to modify this. So if we're looking at it this way, there are two ways to do this. So it comes up and then it comes to a right angle like that. That's exactly what we're looking at.
The first way to do it is you can take an exacto knife and you can cut this right here. So you have all this length to deal with, for doing your horizontal cut. So you know, you might want to cut it vertically first like this, just to create, take that little chunk away like that. All right and the way you're going to do that is just pretty simply. I'm going to try to do it right here on the, I kind of do it to the side and you're just putting the exacto knife in like that. And then you know you've got to be careful here because you don't want to, okay, see how simple that was. So now if you can see I took that and made it completely one solid thing instead of that right angle. And if we compare it to another one, which I’ll grab quickly, you can see the difference in between the two right there. One has the right; this one has the right angle at the end and the other one doesn’t.
08:05
So if you want to do it the other way, you can go, and then from there you can decide, then from there you can decide if you want to, let's take this away right here. You can decide where on this you want to shave off that much or if you want to take off that much. The rule is do not ever go lower than where that right angle was to begin with. This is your no-go line right there. So you know, if you're trying to get as much out of it as you can, you're going to do this differently. You're going to insert the exacto knife like this and you are going to get the angle right there and you're going to snap it that way.
But what you kind of want to do is you want to angle your, you want your force to kind of try to angle it. And I’ll show why. I always get it up a little bit higher in the air just because then my tool won't, then my tool won’t hit the ground, but, and I use my thumb to kind of pry it out a little bit first. And then when I stick my exacto knife in, and I kind of just lay it on that ledge. And then so when I close it, I have the actual angle that I’m looking for and you can see exactly what I did here. I accomplished exactly what I wanted to. I cut it more at an angle instead of straight across. That way I have some room to play with. just a little bit of room for doing a couple of different things for me. And the way I design my triggers, I kind of come right where that angle starts and then nip it off there. So as you can see, I’m still above that right-angle line. The no-no line would be to cut it completely. And I’ll show you this to cut it.
Okay. So now you see how it is completely, what I’m going to bring up, maybe right down there, how it is completely 100% parallel with that opening, like so it looks like a square. Gen 3 is absolutely not your off the shelf, Gen 4’s possibly, Gen 5’s absolutely not. So there are different tolerances with different trigger group, with different generations and stuff like that.
10:16
But you know, if you start this way, you know, like the saying is you can always take more off. This is where I would suggest start with this vertical. And then you can always use my trick that I showed you. If you guys have watched my videos where you're using a tool like this, which is an exacto knife that I kind of made flat. And then flipping this and you can grab in there and sort of grab that and you can hear it making that noise I hope.
What I’m doing is I’m shimming that out. Sorry about that. I'm not used to working on a not flat surface. You can shim that out and then you're grabbing it right here with...and pulling that out so you can actually take this trigger safety tab out, which gives you this. So then from there, just like with this picture, you can decide where and how much of that you want to just take off. You know, like I said, the golden rule is do not even get, you know, if you're just learning how to do this, I would say don't even get close to that, to making that square. That's not what you want to see. You know, you're really, really pushing it.
So that's enough about that. I'm going to get these out of the way. I hope you’re following along. It felt pretty good. I think.
Also, okay, so let's get to these modifications. So the easiest way to do this, and you know, I try to make these things efficient for you guys. You know, you really want guides and things to mark and the more you can mark and here I say measure twice, cut once and all that kind of stuff. It's the same thing with this. So you know, right here with this one, if I bring it up so you can see it close up, you can see an exacto line cut in right there. You can see that. So that is lining up with where the center point of that pin is put in.
12:13
So how do you, it's very simple, very self-explanatory. How to do that? You're just taking an exacto knife and you're making the mark. Let me see if I can focus this in some for you guys. There we go. Man I am getting good. So you're going to take this and mark it like that. It's a little bit sideways on that one. But you guys are getting my point. So if you're trying to push the threshold, you're going to make your line more like, right like that. And then that you're just going to follow that over the top and score it again you know right where the line ends like that. So now you have your line up there too. And then all you're aiming for with the punch, when you go to punch it, is dead center.
All right. Now this is a little bit, this is pushing the threshold. It'll probably won't turn out the way I want it to for demonstration purposes and for liability purposes possibly because this here is an educational video and I don't want you guys doing this at home. So basically right here I’m going to kind of split the difference and make my mark right like this. Okay. So you can see that. And then since I know I angled out, I don't know, I think it's probably, cause I’m on this, you know a little bit about, this gives right here that I’m on so kind of make sure you're super on a flat surface. And since I can see this is a little bit further this way than I want it to, when I come up, I’m going to move my blade over a little bit right there and follow it up this way, and there is my line. Okay. That's another modification, not supposed to see that. I'm just kidding around.
14:03
So right here when I go to punch, you know I’m going to really get that set in there and that's another thing you don't want. So this is going to give a little bit when I punch. So because I’m on this kind of rubbery texture, you can see how that's holding, but you really want to punch it a couple of times. I have a couple of different punches that are different strengths and all that, that you can see. Wow. See that one was like almost too much. So you know, here in the shop I have a variety of punches and you can see, and you guys might mess it up too. So I always like when I do stuff like this, when I’m demonstrating these sort of things, so that obviously needed to be on a very firm surface and I needed to really, really have a focused and concentrated push to get this thing to, there we go. And you heard that, that's pretty dang loud.
From there, and this is the hard, it's not the hard part, but you know, you have to concentrate on keeping this whole, you know, vertical and horizontal at the same time. Maybe I can do it this way. If you're like this, you're going to go the wrong way. If you're like this, you're going to miss if you're like, this is going to be wrong. If you're like that, you really have to be dead center, you know. And that's something you're just going to have to learn, you know, to work with yourself when you're doing this. You know, I’m going to come this way because, for me, I can…(want to get the inside there). For me, I can kind of control a lot of this.
The top hole, you know, it's going to determine a lot, but it's not the end all be all if you do mess it up. So what I’m doing is I’m applying pressure with the back of my hand here. I don't know any of you have ever made a fire with friction, but it's the same principle. So as I’m turning this, I’m also keeping pressure back here because I need the downward pressure, cause this drill is not going to, this bit is not going to go through by itself. But as you can see, it's not super hard, you know, and it's staying straight up that way. How I want it to track is perfect right now. And so now that I’ve got it started, you can see it punched right through there. And now this is where if you do make a mistake and it's going too far right or too far left, you want to kind of back this out. And then actually before you back it out, you want to go reverse. Sorry about that. You want to go reverse just to clean, just to kind of clean it out.
16:19
And you don't want to clean it out too much cause your kind of, you want it, you want that extra polymer in there to kind of grab the roll pin. So when you push through, this is where you're going to really want to make sure you are going dead center in there. So every which way you have to change it to make that happen is what you want to do. And you can see with mine, it's kind of tracking a straight line like that. And the thing is keep the, you really want to keep the ejector in there cause you're going to bottom out on that ejector. And that's a really good indicator that you're through as far as you need to go.
So once again, and this way I can kind of push it this way, I’m sorry, I can push a little bit harder, use a little bit of, use a little bit more and you'll see the, you'll see the polymer start to curl up and then you'll kind of hit a dead stop. And that's something that you're going to have to figure out, you know, in a matter of feeling, okay. So that's done. That hole is done, and you know you can take something, anything that has a smaller diameter and stick it through there just to actually, I want to take a little bit more polymer out of there, just to kind of clean it up some.
Then you can take something like this and stick it through there and make sure you can really feel that you're in there. It's out of the way there. So you can see that. So that you're in there and you're actually, you can see the silver right there that you're actually hitting that, you're bottoming out in the ejector.
So, next this a very handy tool. And I’m sure you all know what these are. They're forceps, so you can basically grab one of the roll pins here and grab a hold of it with the forceps and then, push it right through there to get it to start. Didn't really get that one to start, so make sure I’m still in there. So right here you can push it through to get it to start. All right. Once it started, you're pretty much golden. You know, I wouldn't say use this because you literally might slip and end up, you know, going through your hand. I'll use it because I am a professional.
18:37
And then if you can see this, you can see it's, I’m bringing that up there. It's down in there. You know, you're really, really, really, and you can see it's lined up perfect. It's down in there. At this point you can either put some super glue or you know, something that I like to do is I have these little, you know, if they're 8 watt or something like this, it's a little 8W handheld battery operated. I take these on remote with me sometimes when I’m doing that and once this heats up, you know, you can take a little, you can touch it, you know, just a dab or something like that or if you know, if you have some polymer lying around, like things like this or whatever, you can melt that down and put it on there.
Don't get too crazy with it. Cause remember this is, you know, basically my advice would be like kind of leave it alone where it is. It's not going to really creep up the super glue. I'm sorry, the super glue would be more enough than to hold it in there, just to dab down in there because they really do end up you know, doing a good job of staying there. And with this one right here, as you can see, I kind rip that a little bit. You know, but the gun is, you know, really what's going past is the, is the only thing that's going past is if you look at your back plates kind of going through there, this is a Gen 3.
So that's it. Now the thing that you have to remember is the further you bring it back into the pre-travel, this little bugger right here is going to want to start to encroach on the, grab a slide here. It's going to want to encroach on the firing pin safety.
20:17
So if I can demonstrate this, and you guys can see it, once this starts being pulled further back into pre-travel, you're going to get that phenomenon right there. You know, the further you go back, the more it's going to want to hit that. That's why, you know, and you can take it off to a fault too. Some of the companies I think just take way too much off. So I’ll grab one of my bars. This is kind of the cut that I use right here. And as you can see, that takes off exactly what I’m looking to achieve. This is for a combat kit too. So you're probably sitting right about, you know, right about this kind of like there, you know, and there's a major difference in between. If you take a good look at these two these two ramps, there is quite a bit taken away there and that's completely for safety purposes.
So you have to take enough away, but you have to leave enough too, as you can see, they're raising the same. If you look at my triggers, you'll actually see that it is not touched at all on the top there because I really need that margin to stay there, especially for, you know, not especially for a combat kit, but for any kit, you know, you really want to make sure you're, you know, you're engaging and disengaging that safety. It's very important. So, and that's why a lot of times when you look at some safety, you know, when you see you know, the safety and not really Gen 5 so much cause they're a little bit different. But we'll use it anyway. When you see the battering on the shelves right here in the Gen 1 through 4's, it's because that margin somehow has been compromised. Sometimes it's really not that, sometimes it's just a Glock, you know, they're molded parts, a lot of time and things are all over the place.
22:02
So these are just things to look out for. So these are the things that have to be in unison. You know, you have to, when you start to limit, you know, this is going to limit the amount that this is going to be coming, swinging forward in your handgun. So when that happens, if you don't, like I said, modify the trigger safety tab, it's not going to pop out. So this has to be done. So it's one, two, three, and they all have to be done in order to keep the gun safe. That's why I said, you can see I’m out there a little bit. I'm really, really pushing the third rule right there. That's the edge of anything that I would say any novice should do without knowing all the other things to have to do as far as engagement and all that sort of stuff.
This is probably closer and these are, as you can see these are, you know, just parts I have laying around that I’ve messed up or I’ve been doing like modifications on trying to learn some stuff, but that's kind of, that right there is going to make it so you don't have to, because if this is aluminum, this is an aluminum.