Glock Channel Liner Fix EDUCATIONAL ONLY
TRANSCRIPT | Video Link
Hey guys, what's up Johnny Glock here. I want to show you guys a nugget man. And I, you know, I have recently just, I have an abscessed tooth. That's why my jaw is a little swollen right there in case you're asking. And the hat is so I can keep these smashed on my ears because I'm so ADD if I don't have music running, kind of lose my train of thought. So I need to be kind of rain man about it, if you know what I'm saying anyway.
So say you take your slide in and that's not the case with this slide. This is a Gulf Coast Precision. They're right here in Venice. They are who I use for my slide cuts, tell you man, that is beautiful. Look at that, that is, this one's actually called the Upper Cut.
And as you can see, the machining and the design and the way it's done is just awesome. The other offering they have, I’ll grab out here is called the Haymaker. So you can see there, that's just yeah, I mean it doesn't, it doesn't get any better than that. And this is available you know, through me. If you want it done, I usually send it over to them and figured I’d showcase that.
But say you take a gun to get slide work and cerakoting done and all that kind of stuff and it comes back and all of a sudden, the trigger isn’t pulling as nicely as you would like it to. That's usually because they fried your striker channel. Or they didn't take it out when they baked the gun, or they just didn't replace it. It happens all the time. So I'm going to show you something. It was kind of along the lines of the trigger diagnosis that I told you about, but I'm actually going to do what needs to be done to kind of, you know, walk you through that process.
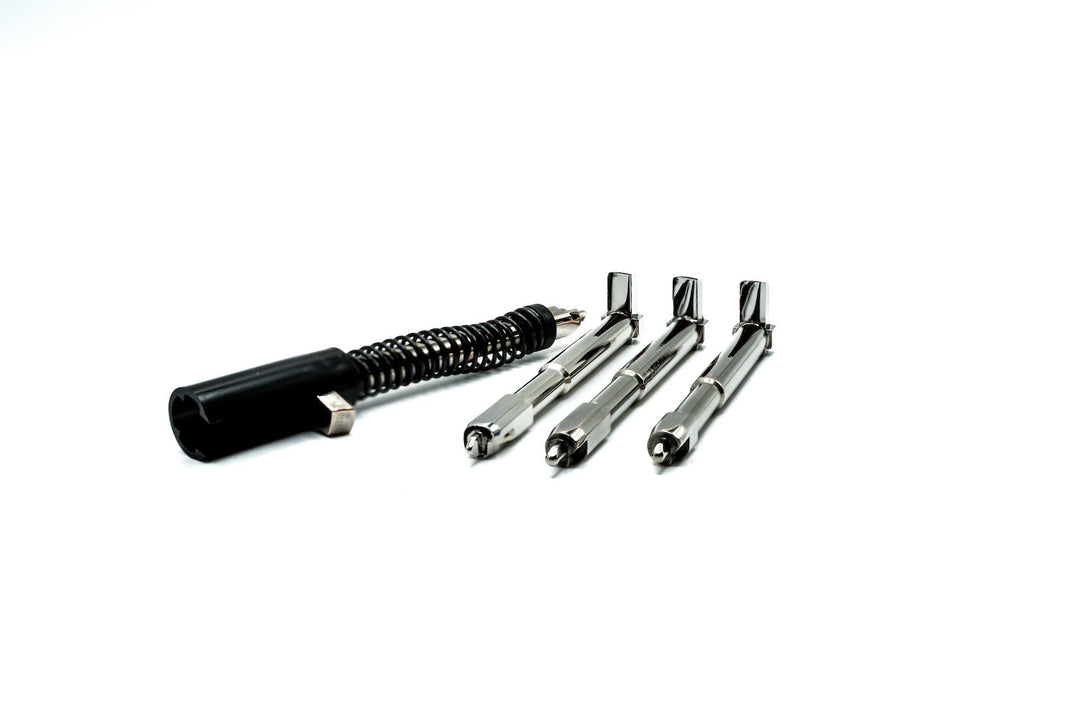
So the first thing you're going to need is a 22 Magnum or a 38 or something like that bore brush. And you know, I have them designed, so I’ll, you know, I’ll sand this part away right here. And then that way I can put it in a dremel. If I have to do it in-gun, which means I'm running it like this, cause I can't get it out or I don't want to try to get it out for some reason, I can, you know, put this extension on it like that and chuck it up in a drill. And that's what I'm going to do today.
So first, and you also have to, we're going to have to look at this as well. So first things first you want to look at, and I’ll bring this down now and you want to look at, I always forget to move this stuff, okay and I’ll bring it here.
02:33
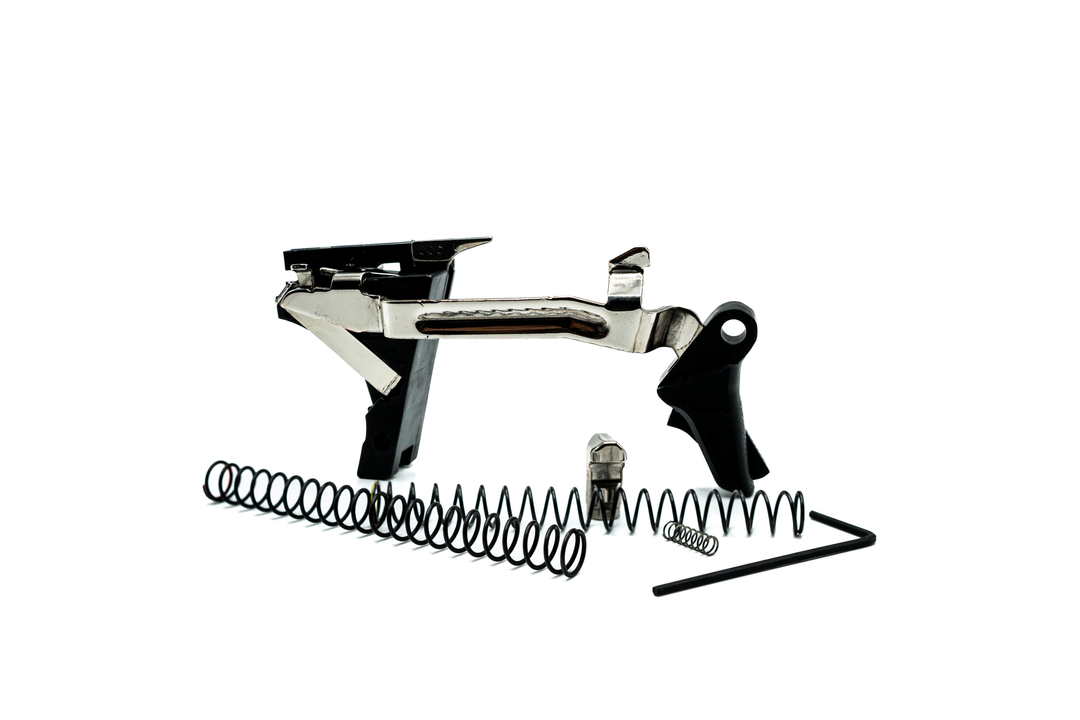
All right. So what's you're wanting to do is look at this part, right. And I get this in focus right here. You'll see, and I’ve already polished this, I apologize, but what you'll tend to see here, and bring it up there and see if we can get it in focus. All right there. You can see that's polished a little bit. You don't want to polish a bunch of it, but see, I kind of rounded it like that, but there's still an edge there. You know, and that's kind of achieved by, this is what I like to use. I like to use this, the Green Flitz, you know, because it doesn't have aluminum in it, ammonia rather. And it's just less harsh on the plastic sometimes for the internal parts. But you know, the way I'm running this is, I am taking this dremel and running it about, I would say 10,000 rpm'ss, and I kind of hold it like this and just go around in a circle. You know, it's really a light. You just want to go really light with it. You can see it's polishing up even more right now. You can see the light hitting against it. And you know, you can do that with the spring too, just because sometimes the spring you know, needs polishing just to help with the whole situation, just for movement there.
So that's like the first thing you're going to be doing and what it will be as a kind of an opaque look to it. You can see it; you can see that it's been friction and plastic on plastic. Like you can see some of that. You can see some of that here. Like see right there. Yeah, you can see it. So see some of the parts there that are just worn, it doesn't matter for the striker channel, but on this piece definitely. And of course, you know if this end of the coil right there is lined up on the cup, it's going to offset it. So basically, I think I’ve shown this before, you're going to have a scenario where, you know, I'm not going to do it. I know I’ve shown it before. So basically that's what you need to do this first.
04:34
Second and I’ll show you this cause okay, so now this part is done, but when we go to stick it in here, it's sticking, especially the opposite way. Now, this is the way it's going to go in. If you ever have these, there's a bevel in on one side that goes down first. So when I feel this here, there's like, it's not wanting to, it's not smooth. There's all kind of you know, stalls to it if you would, you know, its where it’s grabbing, I can feel that. So basically what I want to do is, you know, load this piece up with a little bit of this Flitz. I kind of do stuff like this all the time, but you know, just, you don't need a ton, just get this thing loaded up. And then for this, I'm going to chuck it on and I don't have to use the extension because it's just not necessary.
Okay. I'm sorry. This is a two-speed drill. You want it on the faster speed and there's a little wank at the end there. So you might have to spend it to try to get it, oh there we go, it’s running a little better. You don't want it, you don't want it off. And then you're going to take this and the direction, the direction that you want to go is the direction in which the Striker is going to go. So make sure the beveled end is out front. And you’re just going to go sort of like this.
06:02
And now this is polishing the inside, and of course the closer you get to the chuck, the more pressure you can put, like I'm applying pressure this way. You know what I mean? To get it to polish.
06:22
Anyway, so now when, I’ve could've should've would've shown you the inside of this before we started, it did have a lot of that and it's really, this is one of those days. Oh there we go. Now look at that. That is a whole different story than what was going on in there. I didn't think it would film well, but if I can get it at a certain angle and I just missed that angle, but you guys saw it there for a second. It's a different story. So you can use, and this is a 22. You might want to use a 38 or something bigger cause it'll polish it a little bit more aggressively. But remember less is more.
So now when I stick this in here and go to move it, still got a little bit of it. So what do I need to do? I need to go back and continue. Now the point is, it's a lot better than it was, but it's not perfect in my opinion. So, you know, if I keep doing this and I can't achieve what I want to achieve, I keep plenty of these channels on hand to take care of, or if I'm busy and I just don't want to mess with this, that's another way of doing it. And then actually the best way of dealing with this, you know, Lone Wolf has a striker channel tool and like I said, the bevel goes front that you can place this in and then get it in there and just hit it with a hammer. Cause you really want to make sure this is seated. Because any of you that have taken your striker out and this drags out with it. That's just never, you don't want that thing doing that. It's just you want it in there well, and like I said, this might be a little bit past, these are hard to bring back to life sometimes.
08:06
You can see this one, the outside of this one is that color that I'm telling you about. This just looks, you know, there's two different sheens on there, yeah you can see that. There's two different sheens on there even though these are the outside of the channel, there's two different kind of sheens on that. And this one right here, this opaque is what I'm talking about. What you're looking for on the cups that you don't want.
So let me just grab, I'm just going to take this and feel the difference there. Now this is just like, this is completely, there is nothing there whatsoever. So the next move I would take, if I was going to work this more, I would put a bigger, I would probably load up a little bit more, maybe something with a little bit of abrasive. You know, instead of this, this is more or less designed for plastic. So I might use, you know, White Diamond or something like that. I mean, I’ve got so many different types of polishes around here. Here's the good old Flitz and then I got Simichrome. I have Mother's Magwell, you know, there's a bunch of them, work different on different things.
So yeah, that was a good trial and error thing too, because like I said, this just isn't, it's there, but it's not cutting the mustard. This one is just horrible, you know, cause of the way it's done. And so with this gun and I was just using this as a testing with you know, with the Gulf Coast Precision slide. I'm going to insert this and basically you can do it with your hand, you know if you have a strong hand and put it in there. And once I put this in, I'm going to have just this beautifully smooth striker channel that is going to enhance the trigger for action feel.
09:52
So that was that. I hope that all made sense and translated well. I'm trying to keep it short today because all of my videos are so long. But anyway thanks for viewing and www.johnnyglocks.com is the website. Not that, I mean, it's information where you can read about the actions of the three different levels. Even though I'm not doing that anymore, it kind of gives you like a foundation of what I'm doing, but you know, make sure you call me 941-376-4383 and johnny[@]johnnyglocks.com is the email. And like I said, take a look again, I'm going to put this up here again because these are just you know, these are just stellar. I couldn't be happier endorsing these guys. They're right up the street and I really think once these get out and about, they're going to, you know, they're going to blow up, which is cool.
So awesome machinist, Rick is his name and he's just incredible. Justin's up there too. I used to work with Justin here at Quick Draw Defense. So you know, we're all family and we come from the same kind of perspective. You know, as far as like, you know, client customer service is concerned. So man, you can't go wrong. And that's GCP, which means, and Gulf Coast Precision, GCP Rifle Company. Don't let the rifle company part throw you because they do what we're working in conjunction with Glocks. I do a lot of their triggers. We could just go back and forth off for full builds and stuff like that.
And you're looking for, Rick and Justin will probably answer the phone. Let me, where's my phone? You know what? I'll link it underneath where you can get a hold of these guys in the YouTube, In the description and stuff like that.
So anyway, have a great weekend. And having a lot of guns I'm doing right now, so I'm going to have a really cool trigger video next week. It's going to be the kind of where I have to reposition the shoe and I'm hacking the bar and putting a new hole in there. It's a really, really cool type of a true fulcrum trigger, not just like, just saying fulcrum trigger. It's actually changing the fulcrum point and the pivot point. And then I’ll tell you what, it gets pretty amazing because this triggers are like right about a pound. So you got pound, pound and half. You guys will get the inside look on that.
But anyway, have a good weekend Johnny Glocks in. Thanks for tuning in. Adios.