
Glock Trigger Safety Mod Part 2 EDUCATIONAL ONLY
TRANSCRIPT | Video Link
This video is Part 2 of 2. Read/Watch Part 1 Here
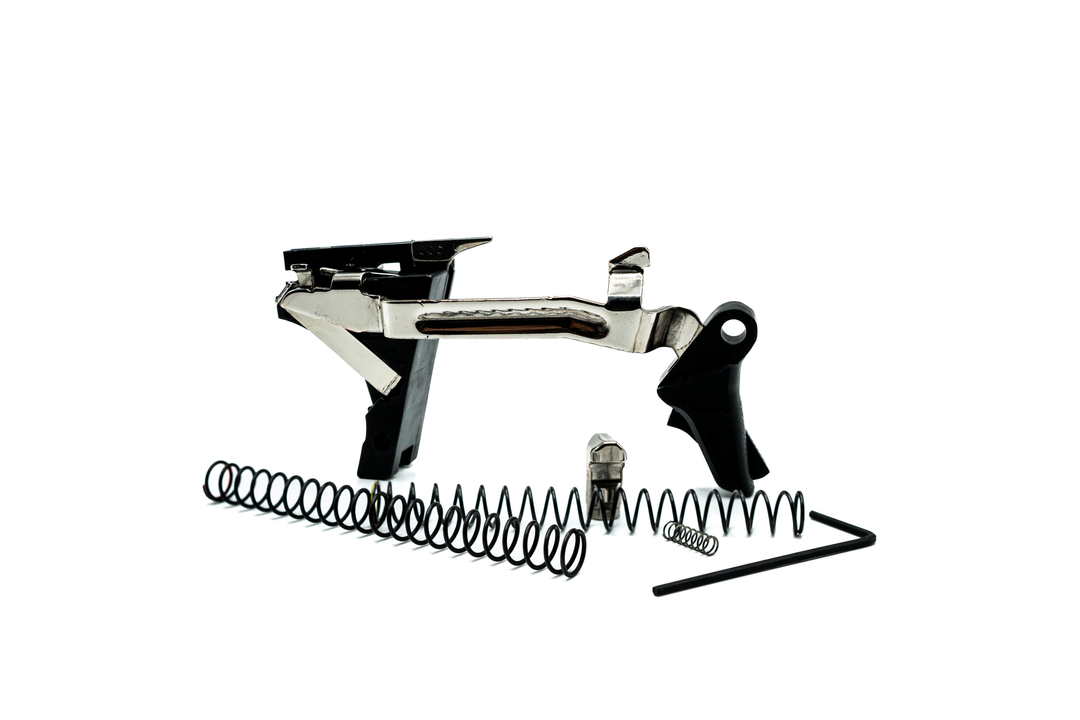
This little piece right here. I'm sure you've all seen it before. It's the New York trigger spring. So drop this bad boy in. Oops.
All right. Now as you can see, what this is supplying is upward tension. Right there. See how it's pushing up, now that's really not what this looks like. I mean the real thing has a spring in it like that. So I mean that's a crap load of tension, right there pushing upward, which means I really don't care where you have this trigger bar sitting. With that much upward pressure, you're going to have to drop it from out of a building for it to actually disengage the trigger safety shelf because you have all this upward, Bing. Anyway, so, I, you know, I have a way of, I mean, using it like this is just, you know, that's the basic, that's the basic way that people get that no wall feel. Cause this is pushing so drastically forward on the trigger bar that it just has that, it doesn't have any staging to it. It's just one pull. If you guys understand the dynamics of how this thing works, but you can definitely, this is a trick man. You've got to know what you're doing here. I'm not going to give too much of it away, but you can definitely put one of these in and modify it a certain way. It's about a third modified right now is the way it is, but you can modify it a certain way that you can get this trigger to function safely and you can see the, you can see it right there. So right there, even with all this upward tension, it's going to have a very hard time dropping down in there even with, there we go. I mean, I'm sorry, my angles off here. I have to push kind of significantly to even get it down.
02:11
Now with the spring on it for God's sake. I mean that's so hard. And that's another thing. They never really mention that when they talk about the 3.5 connector and using a three point...a lot of guys for tactical or carry use a 3.5 connector and this and this trigger spring here, it makes you reset really fast. If you're doing it right with a 3.5 connector and maybe some reduced springs. It's a pretty cool carry trigger. But the one thing about it is, man, you can just, I don't care how high you drop this thing, it's not going off just because of this upward tension that this piece is supplying right here. And now the key is like, how do you modify this to do what you want to do? And not, maybe I’ll do a video on that. We'll see it's kind of one of those gems. But nonetheless it's, it works. And so therefore someone could look at a trigger and say, Oh, that's not safe, but they're not looking at the inside. They couldn't see that, you know, it might be sitting there now, and it might just go click. You know, it might be even less. I mean this is fast right here, but if I was to, if I was to take even more out of it, it would be faster.
But then again, I would have to, I would have to know the compromises. Okay. So I would have to know if I had it sitting all the way back here. You can see that's already, that's basically break zone right there. So even if I brought it forward off...Remember, we're looking at the line right there. If I brought it right there, I could still make sure my engagement is right. Not use the 3.5 connector because I don't want it to drive gradually. I want to drive it right down. So correspondence, corresponding connectors going to need to work with that to get it to drive. And you can see, you can see the bar driving down right there. It's driving down at right there, back here at the connector. You see the bar driving down at a gradual angle right there because that's a 3.5 connector.
04:06
Now if it was a 5.5 connector, man, it's just going to go smack. It's going to go right down. But then you'd have to do some modifying. There's all kinds of different, many modifications you can make to these, to get them to behave like we talk about. You know, when actually you give me a call and you order a trigger. And when you send me your gun it's a whole different thing. I tell people most of the time, you know, the drop-in kit is, you know, 99.9% of the time it's spot on. You know, it really is. It's going to function basically just like this as I put it in. Cause I know it's going to be safe and all that. If you give me your gun, it's going to become a totally different animal in all kinds of other aspects because I'm going to be making sure I take, and this hasn't been done yet, but you can see the movement in there and you've seen the other guns that all disappears. All this, all this wobble right here and this one, this one isn't even that bad. You know, that all gets, that all gets addressed and everything just gets tightened up but not too tight because if you do it too tight, then it's not going to function like a Glock anymore. You know. It's going to start to get finicky and you know, that's really not what we want.
So that, Oh, now I have to remember why I started this video. Boy, I get carried away. So remember I told you a lot of it is dictated by this. So the cut-line that I do on the majority of these when I am going to take material off of this right here is, I am using this and I will mark it so you can see, hopefully I’ll get it right here. I wonder if you can see that. Yeah, there we go. So you see the line connecting right there and that's even a little, that's even a little off. I really want to, I really want to, you know, get this exacto knife in here and make sure it's at the straightest angle coming across in line with this L, with this chunk.
06:09
So basically what I'm doing is I'm just going crank, I'm cutting that chunk right off. So I'm going to do that. Best way to do it is get it up in the air a little bit. I use a magnet. I got, I have tons of magnets around here. Maybe I’ll see if I can, it's going to be murderous, but let's see if I can do this. Stick with me. Up. There we go. Now listen, I've got to literally hold one, this with my legs. So this and I have to flip it this way. Little better light, little better angle.
Here's where I'm coming in right here. Everyone can see that. I'm looking at the monitor again right there. So the pressure I want to apply is out this way because I want to kind of scoop and leave. Blade’s a little dull. So there it is. Okay, so now see how if you're looking at this, there's a little bit above this line, this line, it’s not cut straight across here. That's where I cut the majority of the tactical triggers and the big guns because I know for a fact that is going to completely grab and engage every single time. And then like I said, what you're left with is this little piece right here and see that does have, you know, a better blade and really clean cut will make this straight across. You won't even see this little edge, see this little edge right there. Sometimes if I know I'm building a trigger, I’ll pop the, you've seen the trick, when I take the trigger tab out, I’ll pop that out. Now the, you know, the gentleman that asked me to do this, was asking me about this and those of you that have asked me about this, let me bring it up a little bit more.
08:12
Here we go. All right, so it's basically, I’m just getting, and you know this, I’ll do it with this one, but you really should have a sharper one. But I'm just shaving off this portion right here. So I really wish I could get a better angle for you guys, cause the lighting's just not agreeing with us right here. Let's try that. So I can't do it from this angle, but just so you can see, I'm coming in here and I'm literally shaving. And you heard the snap, and this is, I mean the piece is so small. That's a piece right there. Okay. See it. And then I'm going to come back in and you can see it. Look, it's now, now it is. That little piece right there, made it parallel at that square. And if you don't know what you're doing, you don't take it any further than that period. That's as much as you want to take that, and your gun will stay safe.
Another thing with that is if this has a lot of play in it, let me get this back up in the air. If this has a lot of play in it. Okay, this one, like if I pushed right there. This is solid. So just a little bit of a push will get it to move, see that. And you have a, it's going to, and usually I’ll even take this out, so it looks like that. See, there's a difference in between this and this right there. So if I take this out and stout that out, you know, get that leaf spring to change like I’ve done before in videos you'll see. And the same thing is like, remember I grind this down right here to, you know, get it to be flush so you don't get the line across your finger. But you know, that was the, this is the original intent of this video to show you. Like you do not want to go past that parallel marking of this right here. Unless you really know what the hell you're doing. And you should probably call me if you're going to do it. But like I said, it's your liability. This is just an educational video. I'm not saying you should ever do this. In fact, don’t ever do it. It's an educational video just to show you.
10:34
So and the considerations, like I said for it are, the connector, the spring combination, and the engagement on the sear, capiche? So I know everyone wants this video on, you know, let's flip this back around this way. Let me get my mug back up in here. I know everyone wants this video on connectors and stuff like that, but the connectors are just like, you know they're, yeah, there's a bunch of them out there on the market and they do different things, you know, but you know they're plug and play and the real skill is to know, you know, kind of what you know, build a trigger with just one connector. A gentleman called me and said something pretty interesting. He talked about, you know, changing, it's on one of my videos, like well what if you cut some of the back of the connector off? You know that's very interesting...Do that...because...Glock 5.5's are cheap.
So I’ll tell you like you know this part right here, if you would grind the back of this off right here, maybe take like a you know, 32nd off or 16th off right here. You know, you're creating a completely different dynamic. So you're going to have the drive, the bar is going to drive down, I'm sorry, backwards. The bar is going to drive down and then it is going to disappear. So the bar will drive down right there. And then just think if there's no material (gotta angle it more) back here, you know, what's going to happen right about there. But the point is, you know, and I’ll tell you, it's already broke. You know what I mean? So the shot is already broke by the time it gets there because you have to know actually where that radius is going to hit. So the radius connecting to the connectors, what does all this stuff. So there's different angles of changing all that stuff to get the trigger to behave. But with that modification, with a 5.5 connector, your reset is going to be a little bit quicker. Cause as you come forward, you don't have as much material. So even though it's not going to do anything for the break, it's going to do something for the reset.
12:41
You know, and honestly, even to this day, like every two weeks, I take an entire day, I have this red notebook that I keep all my sketches in. I put my little two-year-old to bed and after she falls asleep, I kind of sit there for like 45 minutes and just write this stuff down. And so I’ll have like an hour and I’ll have a day where I do nothing but come in here and it's like a laboratory. And I you know, I constantly, everyone's like, some people say, why don't you patent some stuff? And I'm like, you know, my attorney said, don't, because you know, you innovate enough that you don't have, you keep building on things. So, you know there's no reason for you to really patent anything. Plus these patents, I mean, if you've read the patent for the Glock trigger bar, I think it's like 30 pages long just for this bar. I've read the patents, so, you know, I understand what they're, you know, you have to be more, you have to be unique in a certain way or you'll have patent infringement.
So basically you know, why patent, when you can innovate. And that's what I like to do. You know, I like to really try to push it. But in pushing it, you have to know the counter and the compromise and all of the moving parts and how they interrelate. And how is that actually going to affect the safety plunger. We didn't even go into that, you know. If I'm taking it back that far back into pre-cock because it's two stage, one, two, how's that going to affect springs over time?
14:07
You know, what's that doing to the striker actually being over-cocked, you know, for a while. There's a lot of considerations that people just don't even put into the mix. And now with the, you know, with the Glock world being flooded with like, you know, I just saw another trigger, another aluminum trigger shoe got released the other day, which is great. I'm really happy for everyone that is, and I know people are passionate about this. There's no like, just salesman, “Hey, let's get together and make a trigger shoe and get rich off it.” You know, everyone is passionate. Everyone loves this gun. And I think that's great. And I'm not going to say, but, I’ll say, because it usually negates what you just said. And...it would behoove everyone to also, you know, study the living crap out of this weapon that you're modifying to get a better understanding, to help keep things safe and functioning over time.
I mean, I am not bullshitting you when I say I have trigger groups out there that are over 100,000. I have friends that are Shooting Nuts. And that's the kind of trigger that I want to build, that's going to, when I’m, you know, set my mind to it. Like, yeah, I should get the 100,000 rounds out of this easily. You know. Glock, you don’t even have to change your springs for 15,000 rounds. The competition springs are going to wear out quicker than the Glock spring just because of the steel mixture and things of that nature.
And another thing is you have some people polish the living bejesus out of the bar and that looks great, but is it necessary? No, it's not necessary to high polish everything. But when you take it out of the packaging, you’re like, wooh, look how polishy, I can see myself in it. That's cool. But there's only like five parts that really need that kind of attention. And the funny thing is when I look at those triggers sometimes, and I see in them all shiny, the parts that need the major attention and the type of attention they need are just completely, it's like it doesn't even register like it couldn't or else someone would be completely, like I said before, negligent if they didn't. If they knew they had to do something and they didn't do it, and I know these people aren't doing that. And I'm getting a little bit off track here, but the, you know my main point is if you're going to do these mods, you better know what you're doing. It goes back to my, it's your gun, your responsibility thing. That was another nugget that I showed you guys how to bend that sear.
16:28
And that's almost to get more contact, that's to get it to engage more. So you might need to do that. You may need to rely on that video to get more engagement when you're trying to push the threshold with this other stuff.
So that's a video for today. I know it's long. What is it, like 40 minutes now? Good Lord. So I had to condense like weeks of this, weeks of no videos into this. But anyway Johnny Glock. The website is going into have some interesting changes here. I finally got a social media guy and we're going to be tying everything together. It's going to be awesome. There will be some click and buy things that we can do. I have a connector coming out that I’ve been working on and the trigger shoe, the aluminum trigger shoe thing kind of got stalled.
I might actually go polymer flat faced. I'm not too sure because I love polymer just a matter of you know, R&D-ing it and stuff like that.