
Glock Trigger Trial & Error EDUCATIONAL ONLY
TRANSCRIPT | Video Link
Hey, you all, what's happening there? It's a Johnny Glock again.
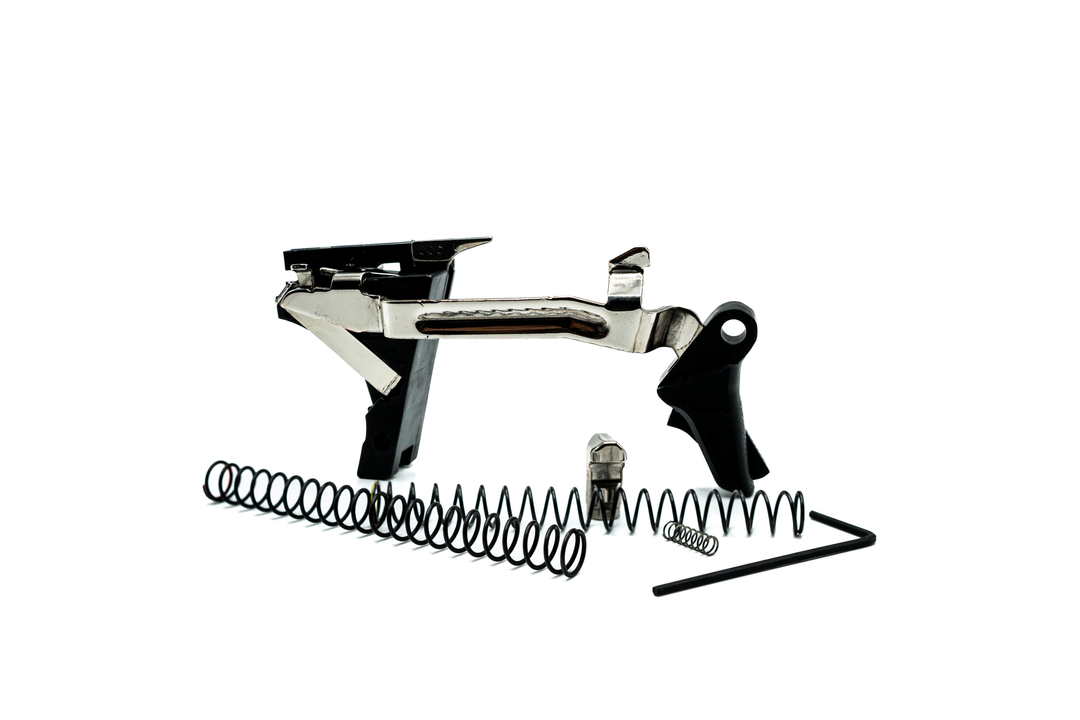
I am doing a video today on, I wouldn't say troubleshooting, maybe just building in general. I'm trying to dial in a trigger for a gentleman that shoots in the name of Johnny Glock. Frank, and he sent me his gun. I have already done everything like polish the slide tabs, the rail tabs rather, tighten the slide, it’s a ZEV Tech slide. I've done some tweaks and stuff there. I've worked on the Striker; I’ve done everything I can to the gun. So now I'm kind of getting into the part where you know, I'm going to get a functional trigger in here and I was starting to build this and I was, you know, running into some safety issues and stuff like that. And I thought it would be like a really good video to show kind of how I'm working with several different bars and whatnot and how the tolerances are and just even how the most minute little slice of something can, pardon me, make the gun unsafe. So bring the camera down like I do. And we’re going to take a look at this fine piece of equipment down here.
So here is, it's a ZEV slide, and I’ve already done some peening to it here in, you can barely see the little tapping marks on there, but everything that I wanted to do to it is done. The Striker is completely smooth, and you see the kind of mirror finish on that. Everything that I want to do. So, you know, first thing I'm going to do is I'm going to, this is a trigger that I built that I, you know, I really like the action on it. I love the action on it. Well, let's start with this. I'm going to use; this is a Gen 3 gun. So I'm going to use a Gen 3 bar.
01:56
The thing with the shooter is he likes a quick break. So if I match this up with a 3.5 connector and a Gen 3 gun, which is, this frame is a Gen 3 and when I'm testing, I pretty much just use the trigger pin. I bring this out just a little bit. There we go. I'm going to throw you guys off either with your angles. There we go, at least get straight except for this thing over here. Pretend it doesn't exist. Anyway. So I pop that in, and I put the trigger housing pin in. And just because of the way this is stippled, it doesn't want to kind of go through sometimes. So that's that. And so when I put the gun together, this is the Gen 3 pull. You see how that spun up. Did you hear that? And it just went off right by itself here. I didn't even tell it to go like this and pull, and then on the rack, wait, let off, see and it shot, it fired.
So this is definitely not a good combination. Spongy and dangerous. See, it's just going right off by itself. Now that's pretty hairy because I know the engagement on this, the slide to frame is as tight as it's going to get. And so you know, there's a couple things. This bar might work in another gun, but it's not working today folks. So I'm going to pop that out and then we're going to switch up to another. This wasn't the one. There's the jammer. Okay, let me see. This looks like no, no, no. Here it is. Okay, perfect. So this is another bar that I started to use that I really dialed in as far as the areas back here and did a bunch of stuff to the, you know, a bunch of stuff to the radius there and it is a Gen 4 bar. And guess what, it's going in a Gen 3 gun. Oh my God. It's blasphemy.
04:34
And what this is going to give us is a quicker break. And so when I pull it like this and if I have tension coming this way on the vertical extension and I push down, that is actually not letting this drop. But if I let go, it's dropping enough that it could potentially drop the striker. It all depends on engagement and some other things that we've talked about. So what am I going to do is I'm going to put this together. And so now let's look at this. So we're at a wall right there, little nudge there to hit the wall and then it should break pretty quickly, and it is. So there is your break. And now your reset is only that. And I see, it didn't pick it up again. So once again, there are some functional issues, and that's kind of what you have to do. [05:39 inaudible]. Again to see. And so now what I'm going to do is, and that might've been every once in a while, when you throw one of these in there or not, I have to make sure I'm getting this in here. They're not really seated. So first or second pull, you have to give it a second to settle in.
06:03
So now I'm going to put this on because I want to make sure the engagement is right where I want it. And this engagement, you know, these are always so hard to see, but for the most part, once I pull down here, it's 100%. So that first time it dropped, I'm thinking it wasn't, yeah, I mean that engagement is so solid, it's unreasonable.
And another thing when you're testing these guns, you know, everyone wants to go like this when they drive fire. And I get it. But that's not the way the guns function sometimes. So you really have to take that into consideration. But what we're looking for here is this quick, you know, there's a little nudge right there and then a quick break. Now is that nudge enough to keep this gun safe. So then I'm going to do something like this and thank God there's a, you know, actually when I'm doing this with a lot of guns, I just put one of these on just to make sure we're okay. So drop, if I hit that, okay It held. But it not might not hold every time. So there it went. So basically this is an unsafe trigger and we have to start over. But the thing is, I really liked the action on this trigger. I like what it's feeling like. And I’ve spent some time with the, I’ve really spent some time with the bar to get it to behave like I want it to. So with that said, I'm going to try to do my best to keep this bar. Now if I put another bar in really quickly, let me save this one here, because this is the one, I like. There's the Gen 3 bar we had, here's another Gen 4 bar.
Now remember the safeties, the trigger safeties are modified on these and I know exactly where I can cut on this tab right there to get it to be, Gen 3’s and Gen 4’s are different. So that cut right there as a Gen 4 cut. For Gen 3, that cut would be different. And we're going to drop this in and see how it functions.
08:23
And this bar is not as refined, but it might be. So once again, I have exactly what I'm looking for there as far as break and resets a little bit longer on this one. And it's just not as refined. So, and now we'll do the test where actually I am going to hit it over here more towards the edge of the table because then everything doesn't jump. But if I'm smashing it here like this and okay. And it held that time and well it's actually holding rather well. Okay that time it didn't. So once again, this has to be changed. I'm going to bring it back down. And this is just, I do these tests as I'm working on the gun and I'm sure, you know, these are Glocks so they can handle it. And I'm sure you'd be appreciative if you send my gun, you know, send me your gun. You know, it's getting run through these tests before actually I do the more, you know, the, the more other tests like horizontal muzzle wall, that kind of stuff.
That was the horizontal drop test. But if it's dropping out there, we got problems. So what I did was, and I know you've seen me do this before, I prepped, I started this where I took out the safety tab on this so it could be cut more like the Gen 3. So I know I have the correct clearances in the back there. So now what I have to do is find the bar that I really liked before, which this might be in my hand. Let me see. That's not the gen. It's the Gen 3 bar. This is the one that's still roughed. Okay. This is the one that I’ve done all the work to that I like. Yeah, that's it.
10:14
So what I have to do is the video that you guys saw where I take apart this thing, take the safety tab out. Unless you like do this a lot you could really kind of mess it up. So. Grab it right there, going to back it out a little bit. I'd like to take it so the whole entire pin doesn't fall out. Okay. So that goes out. And this is the one I prepped up right here. So this is going in. And so now as you can see, and look at this, not much of a difference, but it is. So you can see now it's not flushed to this right here. It is over top of it a little bit. See that? I hope you guys understand what I'm saying. The other one. Okay. I'll bring the other one up. Look where that's cut and then look where that safety tab is cut. It is flush. That you can get away with the Gen 4's, with the Gen 3s. You know what I mean? It's just cause the way the shelf is and you're going to drop actually off the shelf here if you don't have that safety margin and you're trying to push the trigger. And I think that makes the, it's going to make the pre-travel a little bit longer. But the point is, if you're shooting from reset, it really doesn't matter too much. It's only your first shot that you're experiencing a little bit of a, a little bit more of pull. And then after that, you know, you're shooting, most of the guys and we have these conversations, you know, shooting from reset, so to have, okay so I can't back the, it's the trigger tab is not popping out. So I have to adjust the shoe and take this out a little bit. Cause this is a set screw. I'm going to back it out, drop it in real quick with the trigger pin. I don't really even need the locking block at this point. Okay, so it popped out. So now we have a trigger shoe that is engaging, and the lighting is just not agreeing with us right here. So let me turn it this way. Same thing. Good Lord.
12:46
At least you're getting to see a good look at this stippling job. So what I'm trying to say is, there, you hear that? That's engaging. So, and that's what we needed. We needed that to grab the frame and then we're going to put in the, I don't know, I have to push these in but just cause of the stippling job it's a little tough there. So, now you can see you have a little bit more pre-travel in there, in the system. And since I styled that up, you're getting them, feel that? You hear that? That's kind of smack in the frame a little bit. So I'm going to have to loosen that up. But from here, it's that quick break that I'm looking for and then you can see how short this reset is if you're shooting from reset and that's after the first shot that, I mean this is a good 1911 trigger. That is not even a 16th, well right about a 16th of an inch.
[13:54 inaudible] Make sure it's grabbing every time, which it is. I'm checking the engagement. This is the bar that already had the engagement. So a lot of those values are not going to change because of the, there you go, right there, are not going to change because it's kind of the connector. Everything else that I liked about the bar I was able to keep, the only thing I didn't like about the bottom was this, you know, was the safety tab, needed a little bit more meat on it. So I'm going to open this up and show you how that translates, and how it translates is now, now that we put a little bit more material back in here and we pushed down on this, let me telephoto us.
14:34
Now that we've put more material here, okay, you can see that's grabbing the frame. If I push on it with my thumb, it is not going to disengage right there. You can see it, it’s a really good shot right back there of the trigger safety tab. Okay, that is definitely going to not let this go down. It is right on the shelf backing out. You can see right there; it is still on that shelf. Where the other ones were, were a little bit far. They were pushing it like so. See the angle right there. That starts to appear right there and then this one is click, right there, so it is more, it is definitely on the shelf. It is sitting right there and that is, what you're hearing is the safety tab engaging right there and that is going to keep it. This is not going back. I don't care. It's not going to go back any further because of the safety tab here, is engaged, right there. And once that safety tab is disengaged, that's when you're going to see. But it's all the way up on the shelf on that one.
So this is, I am going to venture to guess that when I beat this gun, it is not going to, it's not going to bulk. So we'll bring this up here. It's easier to hit the edge of this cause there's more solidness here. One, two, three, four, five. See, I knew that thing was going to not go anywhere.
16:17
And so look, we have this super short reset. Let me get my finger behind it. It's aggressive. It's fast too. So I mean that, Frank's going to love this gun. So, and right now, just in my estimation I’ve done all the smoothing and everything. So this is probably should be pulling about 3 and see it, it is, it's pulling 3 lbs (pounds) just as we discussed. But what's going to happen is over time, because I know how these guns react, especially I know the different slides, Suarez, ZEV Tech, like you name it, I’ve worked with all of them. So once again, and we went through this before, it is a 3 lb (pound) pull.
Okay, let's do it one last time. And once again it is consistently breaking at 3. It's not averaging 3 like we talked about last time. We have engagement back here. We've hit the gun significantly enough that I know there's a little that in there, which I really don't like that feeling and I know what I'm going to do with that. So if I take the gun apart and that's a cool thing about having all this stuff, I can steal different, you know, stock safeties out of here and be able to put it in another gun. Whereas, you know, years and years ago, before I learned how to do all this stuff, I was stuck, Oh, I ruined that bar, you know, because of just the safety. But now that's not the case anymore. So I'm going to back this out a hair, and that still might not clean it up the way I want it to, but I have to go, you know, increments at a time to get what I'm looking for.
18:10
And it did. It's gone. So remember, I'd go like this and it would be, if you back up the video, you'd be like chicka, chicka, chicka, That's just a nice, smooth, safety now, now when you hit the, when you engage in the wall, you can just hear me engage in the wall. It's really just nudgey. You know what I mean? It's not stacking or anything. It's just wall. And that's really, you know, especially when the beeper goes off, you know, that's not really going to be too perceivable to you. So there's the break, reset, break, reset, break, reset, break. This is all happening at three pounds. It is tight as a duck's arse because I already did the tightening here. The lock up itself is tight. So you can see this barrel is like just, you know, it's tightened to the point where, you know, you don't want to over tighten it, but this gun is going to race and run like a machine, like a Rolex.
So basically, I just figured I'd show you that to explain to you the difference. You know, I know these values off the top of my head. So if I see a trigger safety and I say, Oh, I'm matching that with now, that was going in a, if that was going in this housing with a different cut, that would work because I know the margins with the shelf here and how that's going to function. And that all has to become second nature that, you know, and it also depends on what connector I'm matching that up with. Some connectors will not even allow, the first bump is going to stop you at the connector before you even hit the shelf, the drops shelf. So there's all kinds of different pluses and minuses that we talk about. And you know, the name of the game is to keep the gun safe. At the end of the day you want to do exactly. You know, I want to do exactly what the shooter wants, but at the same time I want to make sure that it's a completely safe gun and most guys get it. You know what I mean? Like I’ll get to call up the guy like wants a 2 lb (pound) trigger with no pre-travel whatsoever and it's usually like they probably haven't shot a ton. So, and realize like, yeah, well, you know, you shoot from reset and you know, it's one of those things where a Glock trigger, you know, its sub 3, like say in between two and a half and three, the reset is awesome. It's completely safe, unbelievably safe.
20:28
Of course, if someone wants those things, I have to build the triggers differently. I'm doing a whole entirely different thing to get that trigger to be like a pound, a pound and a half, two pounds. It's not even in this whole realm. It's a whole different, you know, you're drilling out, taking this off and you're repositioning the actual shoe on the bar, and you have to cut the shoe. I mean, you have to cut the bar and you know, re-drill the hole. It's definitely, and you have to have the gun in your hand. So, but for the most part, you know, those of you that have the kits or that are, you know, think of ordering a kit or you're sending me your gun and you're knowing that these are, this is what I’m, you know, working with in these parameters to make sure the gun is safe. It might have a little nudge of pre-travel, but at the end of the day, you know what I mean? Like, you're going to be able to sleep better. I'm going to be able to sleep better. We're going to know it's not a gun that is going to ever. And you could see I was striking that gun pretty hard on there. Frank I'm sorry for that. I know you get it. So and I appreciate you letting me use your gun, even though I didn’t ask you, I appreciate you letting me use your gun for this video. So anyway yeah, this is getting ready to, I'm going to go shoot the crap out of it. Put a button on the crap out of, shoot like 200 rounds maybe just to make sure it's functioning exactly how I want it to. And then let's get it shipped out.
So just another video from Johnny Glock. www.johnnyglock.com is the website and call me at 9413764383. I did have another parfait today here, quick draw defense in Venice and I tell you what man, they better, someone better eat all this cause there's some left in the fridge. I can’t get rid of them. They got to get rid of them cause I'm like ready, ready to lose it. But anyway yeah, that's it. So keep subscribing, keep checking out the...subscribing, you know, subscribe if you want. And I’ve got a bunch of more videos come in on the Gen 5’s and a bunch of cool other stuff. And I still have some things in the work as far as some designs and I'm coming out with some partnering up with some machine shops and stuff like that.
22:37
So, hey, you all have a great day and take care. We'll see you.