
Addressing Glock Transfer Bar Drag EDUCATIONAL ONLY
TRANSCRIPT | Video Link
Hey guys, this is Johnny Glock from Johnny Custom Glocks. The reason I'm making this video today is, and I have addressed this on the detailed slide and frame preparation [video], but I wanted to make something a little bit more readily available. And it kind of has to do with the bending of the connector and it pinning against the outside of the polymer and that being an issue or if it's too far the other way, it's going to jump the channel.
Basically with every gun there's a sweet spot. How...when it leaves, you know, the shop here, I have it bent a certain way of which I have found to be kind of like the middle ground sometimes because it is a production gun. When you get it into your gun, it might respond a different way. And there was a couple, actually two calls. A call I had...it dragging. And so I told him I would actually shoot a video to explain how to actually address this specifically. So I'm going to drop it down now to the gun. And basically, I just wanted to state too, if you have a trigger built by me and you're looking for a sub 3 lbs (pounds), it should be pulling sub 3 lbs (pounds) with a 4.5lb (pound) trigger spring. That's the orange trigger spring that I send you. That's the 100% reliable, no light strikes, it’s going to bang every time. I don't care if it's a two Lone Wolf, whatever, steel primers, any kind of checklist of Czechoslovakian stuff.
So, the pull weights are averaging, you know, sometimes 3 to 5, but most of the time in between two and a half and three with a four and a half pound spring. If you're above that, you probably have some drag in your system. And we're going to look at that today. Also if you use a 4lb spring, it's usually 2 pounds, two, two and a half to seven, five. Now, like I said, it's a glock. It's a production gun, so it's not you know, it's got loose tolerances. So these things, there's a little bit of a leeway either way. Most importantly, like throughout my entire career doing this company, I’ve had literally one return and I will work with you to dial it in however we need to, because I realize this happens and that's why I care enough right now to make a video to address this for you guys that may have this problem, even if it's not a trigger system of mine. So I'm going to drop down to the gun and we are going to take a look at what possibly could be going on here.
02:47
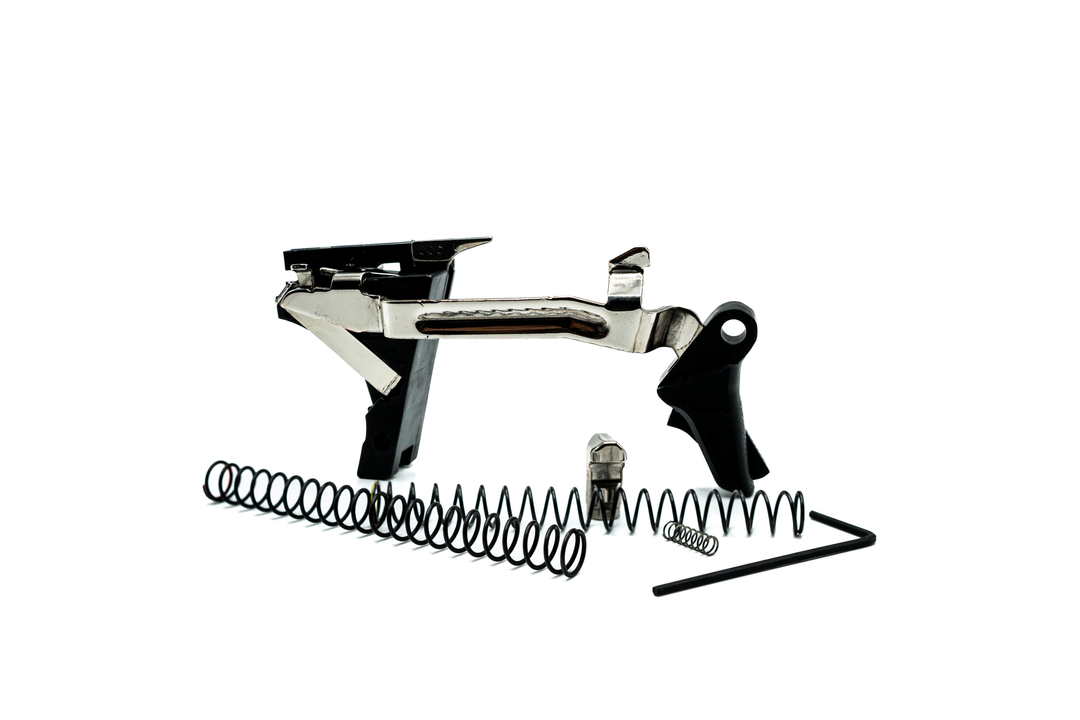
So the part that I'm talking about dragging, let me get something to point with here, is right back in here. Okay. So where the connector and the outside of this bar push against the gun laterally, there could be some drag in the system. And so basically the way you're going to test for that, and I’ll bring it back here, you're going to put a finger on here because you can use that to go back and forth and the other finger on the trigger. This is the movement right here. So if you can go without depressing the trigger safety because you go to far forward, your trigger safety, will pop out and won't return. But this is the amount of movement I'm talking about right here. And as you can see for the most part, this gun is moving pretty freely in there. A lot of times, especially on Gen 4’s you know, with all the swing out of the, you know, with all the reset, with the safety tab they have, sometimes it won’t return all the way. You get it stuck. And so basically you think your trigger safety is on, but it's really not, because you'll check stuff like that usually when you put your gun away. But I’ve seen it happen so many times at the range and you know, if this at all what like a lot of people that use the 6 lb (pound) spring here, which I just don't advocate whatsoever, you know, it saves you a couple ounces with your trigger pull, but what you lose in reset is just not worth it in my opinion.
04:25
You know, basically if you're shooting out there, you know, you shoot from reset. You don't have to, you know, you don't, not taking your finger back like this. You're just coming right back on reset, you know. So this is one of my groups and you can see it's a pretty tight group right there.
And this is an over-stop right there, it stops. So you're looking at, you know, just basically, you know, a little bit over 16th of movement back and forth. So we're going to pop this out.
Okay. And first of all, what you'll see, and there's not much on this you can see right there, see that little mark right on the outside of the bar? It's right there. Right there. That's a telltale sign that you're going to have a lot of drag. If you can see a really, a scuff mark on there, see, I can see just a little bit right there. That's just because it's rubbing against...this was so hard to get on camera the last time I tried this. All right come on. Yes. It's so hard to pick up. It's this piece of polymer right here. So even when I tell, okay, there you go. So you can see it's a little bit, it's a little bit worn right there as well. Probably from the way he had it, you know, with the Glock OEM connector prior to this, this gun did have a ton of drag in it. So what happens is you flatten this out, this area out, and then so you have more surface area rubbing on the bar, and not to mention you have usually carbon, cause you know, no one cleans their Glocks, which they should, but you have a ton of carbon back there and it basically just starts to scrape like a scouring pad and really slows down the system. That's a major point of drag. So the way you remedy that is...and another thing, when you're putting these in, the spring has to stay in that little groove there. A lot of times, if you just put this in real quickly, I'll always look down because it happened right there. So the spring actually is in, looking like that, instead of in the groove.
06:54
So be very careful that you're dropping this in and keeping in that groove because that torque via this little spring to the right of this thing or to the left of this, the little tail there that picks up the trigger spring could cause major problems. So basically, we're talking about the angle of the connector. So you can see right here, this is pretty much where I put it just enough so that the, this is going to be tight right there. So at the very top, and I'm going to pull it out just so you can see what I'm talking about. So this is usually what you get with the OEM guns that come out like that. So you can see at the very, look I am talking about this little triangle. Sorry, this little triangle area right here, if you put it...so...watch it go in, right about there is where you want it. You want it sticking out just, and this is a rule of thumb, but you know, like I said, if you get into your gun and you have too much polymer there, there's going to be an issue in a lot of the, you know, take down the polymer. I've had to exacto knife some polymer off in those areas because it was so bad.
But basically you want, you don't want them to be flush with these, there's some, you know, piece of polymer that outcrops here and there's a piece of polymer that outcrops here. You don't want it to be flush with that. If it's flush with that, your chances are the bar is going to jump the channel and it is going to feel like, kind of like a squirt gun because all it's doing is going back and forth up over top of this, up over top of this and not ever coming into reset. It's coming on top of the edge of the connector. So what you're looking for, and I hope you guys are able to see that, right at the very top. I’m going to push this in there so you can see. Right at the very top, right there, there should be no space. It should come out. I know this is high definition, but at the same time it's sometimes really hard to get this angle so you can see it.
09:06
I was having a problem, I was trying to shoot this last night with a phone in my house, so it wasn't working at all. But what you'll see is if it's pinning the bar, I'm just going to push this one out a little bit. It's because this part right here is bent too far out. So you can see that's not 90. A lot of people say bend it to 90, but it's really not bent to 90, probably more like 80, 85, you know, 87. But you know, when you push it in, all the way, you can see it gives just a couple, just a little bit right there. And so when this works, you can, it's going back like that, but that's the optimal place that you want to have it. Now, of course, if you have, you know, issues with the gun, it's in the video that I have about you know, addressing the frame and slide that you'll have to look at that, because there's a little bit detail thing there.
You always follow the gun, you know, if there's just don't get in there. A lot of people say, Oh, there's the bump on the bar and that causes everything. But Gen 4, that's just total hogwash. They've been using that bump on the bar in the big guns since day one. It's actually a better idea because it keeps the transfer bar straighter on the way back. And metal against metal, one rounded piece of metal on metal versus, you know, the push out. If you feel a Gen 3, if you actually pull the trigger and hold right here, you'll feel the trigger bar rubbing against those three pieces of polymer. You can see a little wear on those right there. So these three with the Gen 4 bar, it doesn't really have the ability to touch those because of the way it's transferring because that dot, that dimple on the vertical extension, which is right here, that doesn't mean you don't keep it smooth and polished, but you don't have to put a Gen 3 bar in a Gen 4, especially now because this is the new Gen 4 bar.
11:33
It is a 3600-142 and that's either smooth or rigid. Is the denotation of this bar. So, you know, the original ones had the two dots. And you know, I heard someone say in a video, I spent some time watching videos and I was completely blown away by the amount of ignorance that I saw with like 100,000, 200,000 hits on it. And I'm just like, there are some people being seriously misinformed. A gentleman said that Glock had changed the, he said, trust me, I know it's done. I know this is what they did. He said they changed the angle on the Gen 4 of this, get a pointer, of this right here, this angle right there to the Gen 3. So basically if I can grab a Gen 3 really quick. So here's your Gen 3 housing. Here's your Gen 4 housing. The Gen 4 housing has been changed too. They are now 53, 57, you can see that. And I had this thing here because I was doing this test myself. Maybe I can find it quickly.
I can't, just figures. But basically the test is if you put a piece of metal through here where the connector, right there, a piece of metal through here and running all the way, running all the way through this one, you know. If one was off it would look like this, you know, that's a gross representation. But otherwise they're both a straight line. So you'll see them both line up straight like that when you put a piece of metal through them, there's no change in that.
So they did not change that. What they changed is the connector itself. It's called a Dot Connector. It's at an 85 degree angle. And so when they did that, they had to change the radius of the bar a little bit, back here, because every Glock has to be 5.5 fixed. But if you've ever been to the factory and you've watched the trigger testing pull, a 5.5 fixed is anywhere from 4.9 to, I think 6.2 so long as it's in that range, it leaves the factory with a 5.5 fixed stamp on it.
14:08
So if a department wants all 5 lbs (pounds), say a bunch of 5 lb (pound) pull, 22s, they're just going to have those 22’s is coming through until, you know, the ones that pull 5 lbs (pounds), they’ll just put it in a separate area. So they know that they all pull 5 lbs (pounds), but they just don't all come off the assembly line sort of thing that they have there at 5.5 lbs (pounds). And that's the thing. Also like people will get the trigger system that I designed, and it might be pulling a little heavy and it might not be because of drag, you know, it might not be, it might be just be, there's some other issues going on that have to be addressed. And that's something that I am more than, you know, willing and ready to talk to you about, I’m just a phone call away. That's kind of like what separates me from a lot of people, a lot of bigger companies. You're talking to the guy that actually built it, put it together, designed it, all that fun stuff.
But whatever it is, you know, we'll get you through it. I've even had just set other people, like a whole new system to someone, just because their gun was acting a certain way. And with the information that I took, I was able to ready it, but remedy it. But you know, if you're really persnickety, definitely send your gun into me. You know, if you're a complete trigger snob, and believe me, I get it. I don't think that a drop-in is going to do it. I don't think a drop-ins’ really going to do it 100% to your standards. Send me your gun. It's very, very easy. Get it back to you within a week. It's not like we tend...2 weeks the most. You know what I mean? It's not like its going to be held up for 6 months somewhere like a lot of the other people that are doing slide work and grip work and stuff like that.
15:46
So anyway once again, this was supposed to be a short video that turned out to be pretty long and don't believe everything you see on YouTube, especially because man, I saw some kiddie put a you know, people putting screws inside their frames to limit pre-travel. The best one was a plastic fork. Someone put a plastic fork, and I get the idea cause it's the same shape as this, but they put a plastic fork to limit the pre-travel in here. You know, especially if you use it as a self-defense gun, you know, come on, you don't put a frickin plastic fork in your trigger, simply, it's just too risky. You know, you want that gun to go bang every time.