
Glock GEN5 Trigger Part 2 EDUCATIONAL ONLY
TRANSCRIPT | Video Link
This is Part 2 of 2. Read/Watch Part 1 Here
Hey, YouTube. What's up? It is Johnny Glock here. This is going to be part two of this series that we're doing with the Gen 5. I'm looking at some of the different things you can do with the trigger and comparison from 4 to 3 to 5 and you know, lots of different stuff like that.
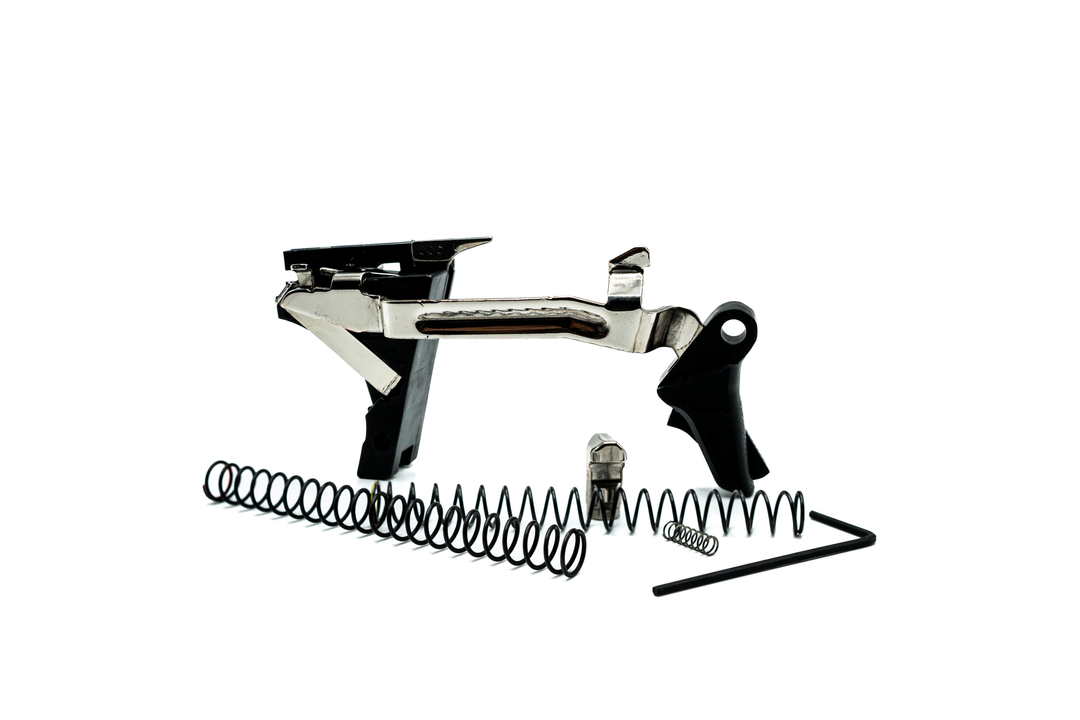
So when we left yesterday I kind of maxed out what I was able to do with the plug-and-play stuff and I wasn't getting the results that I wanted to with the Gen 5 configuration. I said the Gen 5 is very much like the Gen 3 feel, it's the same, just about the same radius on the transfer bar, bird's beak. Consequentially, I’ve heard people call the vertical extension the bird's head and that is called the Shark Fin. So get it together, man. That's the slang. Anyway. And if you don't know what the vertical extension nomenclature is, it is the part that depresses the safety plunger. It is this part right there. So that's the bird's beak. That's the shark fin. All right. But if we're talking real Glock stuff, it's the vertical extension and just the rear of the, the radius of the transfer bar, and then that's the sear. You know, that's the sear. That's the cruciform and that's the trigger spring tail. I'm sure they have other names for a bunch of the other stuff, but that's basically what it is. So where we left yesterday, I'm going to bring the camera down and we talked about how inherently the Gen 3 bar with a 3.5 combination was like, you know, hitting the ball out of the park because it gives you less resistance and made the pull for all intents and purposes feel better. Not as much resistance and it shortened the reset. So that's why people loved it.
02:14
But after a while, what would happen is, you'd start, and even early on, if you were like a trigger, if you were into triggers, you'd see that got spongy, you know, and I can't tell you how many people would talk to you. Like after a while, I had my Gen 3 started getting spongy, after a while, my Gen 4’s started getting spongy after the break-in period. Not that the Glock needs a break-in period functionally, but everything has a break-in period. You get a new motorcycle, they say thousand miles for the break-in period, everything's working together. You know, Les Baer, 500 rounds with the trigger, it's going to basically be, you know, the sear made into the striker and that's going to be the main kind of break-in thing. That's why if it starts out at 3 pounds, probably after a thousand rounds, you're going to end up at 2.5. It's usually going to half pound is going to drop within, and unless you send your gun to me and I'm doing the striker work and you're doing the striker work, then, you know, sometimes it doesn't get any better than that. You might have a little bit more break-in, but for the most part, man, it's broken in. If you have something that's you know, say your striker lug face here is honed to right there to 12,000 grit. And so is your striker, and so is your sear. I've even used CBN emulsion on some of these things in the micron and you know, half micron and that's I think 60,000 grit or something like that. So you're talking about two super slick surfaces, you know, the break-ins broken in. And with that, you have to be careful because you know, you don't want to break-in, you have to make sure everything's on with guns like that because engagement is a big part of that whole thing. And that thing's being that slick man...it's got to be tight. So without further ado, I'm going to take the gun. I'm going to take the camera down and we're going to take a look at this kind of where we left off yesterday.
04:06
And this is the, first of all, clear gun, no magazine. This is the Gen 3 that we were talking about that, you know, like you go in there, has this rolly sort of spongy thing. That wall is just not defined and then you have to break and then it breaks almost all the way back at the trigger guard. I'll bring this in. I know this might, I don't know if this is upside down for you guys or not, but it's, you can still see it very well. So even if it's upside down, you know I'm talking about. And then your reset is short right there. So break, short. And like I told you after the first break, from there it kind of changes. And that's the, that's kind of part of the striker fire system it changes. So that's all you're doing. And you know, it is a wall right there. And just because you're not coming through it, it has a different feel. So you're not coming through that wall unless it's the first shot or unless you're slapping, unless you're slapping the trigger, what they say, if you're not shooting off the reset. So as you can see, it goes pretty far back and as the position of the trigger, another thing you know, to take account is where your finger is on here, and with the way the finger works, you know, sometimes if you get it breaking forward enough you're going to be able to get you know faster. If you see if something's back here or up here. There's just different ways the, you know, the physiology works and, you know, it's like Golgi tendon organs and muscle spindle cells. These are things and stretch receptors that are in our muscles. And once you go past 90, things start to switch and it's all, it's pretty interesting I guess if you really want to get into shooting form you know, that will factor in with your isosceles [shooting stance] and your grip and all that stuff.
06:00
So if you remember yesterday, the reason I showed you this trigger, because this is exactly how this trigger looked yesterday because we had maxed out the plug-and-play. And when I say we maxed out the plug-and-play, I’ll show you what I'm talking about. That means the set screw that I put here in the, in the trigger shoe and the set screw that is put in the, and these are R and D parts, in the trigger housing. I did everything I could with a bunch of different connectors and the best I could get with that plug-and-play was like this. It was very, you can go back and review it. Very Gen 3ish with the Gen 5. So what I had to do was I had to go back and modify some things that were metal, you know, stuff like that. I had to modify, I ended up going with a minus Glock connector with some modifications on it. And I actually had to modify the bar a little bit to behave like I wanted it to. And there were some interesting modifications because they were actually on the cruciform.
So I'm going to show you how this, and it's coming out and it's still not exactly where I want it. So, you know, like that's the thing, you know, I sometimes I keep these guns up to two or three weeks just to make sure that I'm getting exactly what the customer wants. So you can see there's not, it's not like this one in comparison where you got the, and I'm not pushing any harder. You know right there, there's all that. And then you can roll back. With this one you know, it's literally a dead stop wall right there. And then from there you're breaking, and I’ll take my finger off and as soon as it breaks, so you see, okay, that's being held back because that's the system. So it's broken. It's against the trigger stop that was in the housing right there. I'm going to do it again so you can see.
08:03
So that's where that trigger ends as opposed to that. Which is, at the end of the day, you know, these guards are, I'm sure, similar. So, the position is different there. And then from here, from the reset now and then the reset was longer yesterday, if you remember now, it’s just right to there. So break, reset, break, reset. And you could feel like, you know, once I press, if I press through like that, we're good, but I'm starting to feel a little bit of a, sometimes the bar and these things start to show up after a minute not right away, but sometimes you get a tug-of-war in between you know that right there, what I'm talking about right there, and the sear in the striker. So you know, they're opposing each other and that's exactly when you're down on that trigger. And you can feel, if you get to a certain point and you're just like, it feels better now probably because I'm racking it, you know, that's another thing. But there is a small little glitch in there that if I'm doing a trigger pull, you'll basically see it in there because it's not my finger, it's a mechanism that I'm using. So what I'm going to do is I am going to just back this out ever so slightly.
And that's going to just make it break a lot cleaner. Let me feel it. Yeah. So now that is completely clean as far as I'm concerned and resetting, like I'm not completely pleased with this reset and that's going to be the next thing I'm going to go after with this. I wanted to, I remember I couldn't find my trigger gauge yesterday, so we're going to do that today and see exactly where this is pulling. Okay so we're under, you know right about two and a half pounds. See that? And that is with a 4.5 pound striker spring. Now see how glitch there, it held a little bit. Remember I told you that mechanism sometime. So it's a little heavier there because I pulled, I didn't rack it and let's see, cause that's actually how the gun functions. Yeah, a little heavier there too.
10:38
So once again, there's a couple things I still want to clean up with this trigger, but we know that we're, and that's right, again at two and a half. So we're in that 2.5 pound range. Which also with that 4.5 pound spring, and like I said, I haven't messed, like you've seen the 42, 43 video where I take the actual thing they're using as a trigger spring, that mechanism and take the spring out and do some tricks that I still have to do that with this gun and I’ll see how it turns out.
But you know, at least I have other springs to mess around with to see how that's going to pan out. So like I said, I only have one shot. Oh no, its kind of ups the ante with some stuff, which is really cool in my, you know, the way I think about it. But I just wanted to show you that. That's part two. So, you know, we maxed out the plug-and-play in part one. I showed you how inherently the trigger has like a very Gen 3 feel which I get. And then I get why they wanted to bring that back and now the dimple isn't on there and you know we'll hear stuff about that. I'm sure. And like I said, it's a very safe system. It's designed incredibly well for what it's supposed to be doing. Like I said, the engagement is an unreal and that's something that you have to, that's something that I have to work with to, you know, kind of get a feel for how, that's a big part of it. That engagement controls the speed of the [trigger] break. So there's a lot of different augmentations and modifications you can make there to get that to behave the way you want to.
So today we kind of worked more on the position of the trigger and how I wanted to get it to break earlier and how I wanted to get it to stop earlier. And from there, the next video, which is more than likely going to be tomorrow, is going to be about the [trigger] reset. How we can clean that reset up. Not really clean it up, but just, you know, get it as short as possible. So we're breaking at that, you know, 16th break, 16th break. So they're balanced back and forth. It just gives a type of like, the finger likes that and you know, so does muscle memory.
13:01
So that's where we are. I'm getting another Gen 5 in tomorrow, I think. So it'll be cool to be able to actually compare apples to apples. I'll be able to take one stock right out and compare it to this one that's going to be shortly finished. So that is the video for the day...