
Glock Build gets Busted part 1 EDUCATIONAL ONLY
TRANSCRIPT | Video Link
Hey, YouTube what's up? Johnny Glock here.
I have an awesome video for you today. You know, I like to do this stuff really impromptu and you know, when something presents itself for me to just do what I do, you know, instruction, whatever. And remember this is educational only. So do not try any of this at home. I'm actually not doing anything per se in this video, but I am going to show you some things. Let's just start with a story.
Okay. So a gentleman buys, this is David from New York, just got off the phone with him, I had to get a lot of information from him about this. So buys a brand-new Gen 4 out of the box, sends it off to a company, be unnamed, pays $2,000 and waits 6 months to get the gun back.
It comes back and you know, very unhappy with the, you know, the trigger and the functioning of the gun. And so he sends it to me to go over and do my enhancement and all that stuff and put you know, design the trigger to be better. After he's already spent $3,100 on this gun.
So. There were so many things presenting in this gun that are just good information for, I mean, people to have, things to look for. You know, someone like me at a glance can see things that someone that just isn't in the profession, you know, for whatever, you know, because they're not doing it every day. Just like anyone that's a professional that can look at, you know, like a good doctor is going to be able to diagnose things when he walks in and stuff like that.
But with this particular build, I'm kind of blown away because there's definitely things in here that are telltale.
02:06
Now, let's put it this way. If I was...I keep bending down here, I have the camera down. So if I was, if I was put on a court, what I'm going to be telling you right now is all from my professional opinion. If I was put, if I was asked to be like an expert witness on some things and they said, do you believe this to be true? I would have to say absolutely. In my professional opinion, this is what's going on here. So let's get the camera down to what we're talking about. And I hope you guys are going to enjoy this video because I know I'm really going to like working on this gun. So going to bring it down.
I’m going to try to do a lot of, shall we say, just want to make sure I get a decent, I wonder why this thing is, that's bizarre. I'm trying to figure out why I can't get it to, And this thing used to work pretty good. And I’m not editing this because I just don't have time. Okay so here we go. This is, and I know it's a little bit crooked. I do, apologize. I don't know what's going on with my sophisticated camera shit.
All right let's bring it like right there cause it's going to start to settle and settle and settle. There we go. It's like a fucking magic show. It's like a polymer 80 of cameras but not the camera, but the actual mount. Okay so here we go.
Build comes back, hates the trigger, figures out he'll shoot it for a while. He puts 700 rounds through the gun. So you know the gun has 700 rounds through it to my knowledge and even what I'm seeing here is stuff that you're going to see closer to I don't even know what round count, maybe 5,000 to 7,000, somewhere around there. I tend to see these things presenting.
04:43
This is driving me crazy guys. I don't know how to fix it. I guess when we start close up anyway, you're not going to have to worry about it. Let me see if I killed this light, if it's any better. Okay, there we go. You might be able to see, there's not much shine on it.
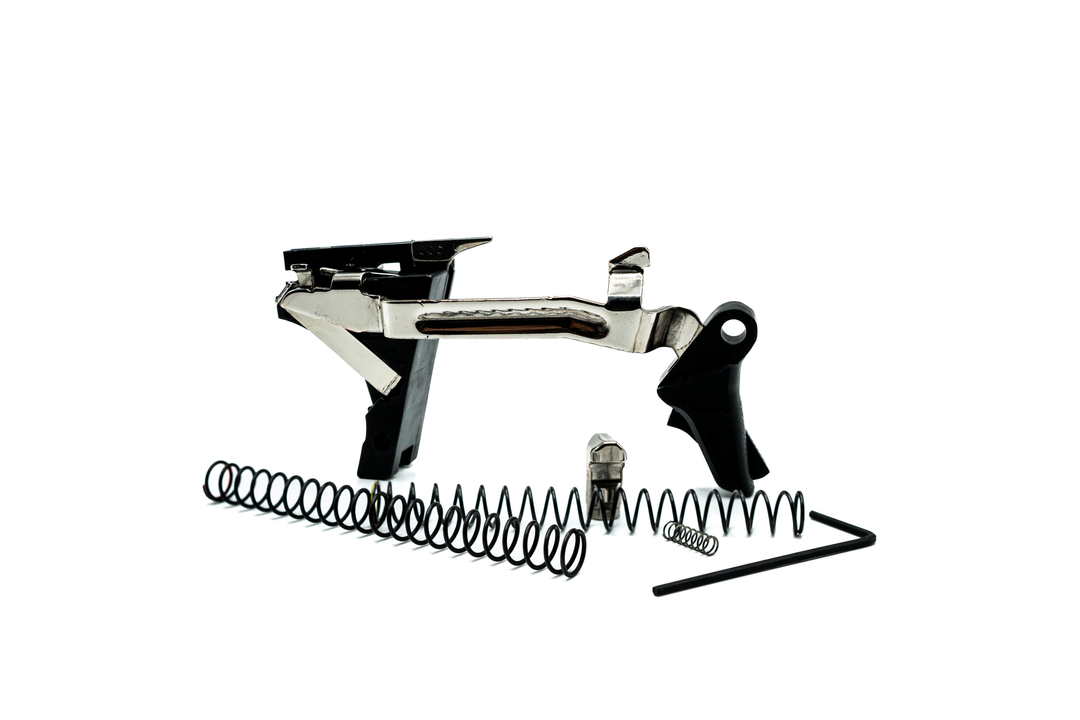
So, you know, it's a Gen 4 frame. And you know, not going to say anything about the framework or anything like that cause it's really not my forte. You know, I do the laser stippling now. It's kind of like that waffle velvety stuff with the cutout on the inside and the, I think this is a trademark to cut or something like that. So I do like the magwell though.
Anyway, getting to and actually if I look inside the frame, cause remember you know, if you have some of my videos and let me take this telephoto right now so we can see what we're dealing with here. So if you watch my videos, you'll know that you know, there's a lot inside of this frame that can tell you a lot of stuff. So I'm having you look at the polymer outcroppings that are, let me get a pointer. These right here, one, two, three. And then the fourth one is right there.
06:00
Now it's a brand-new gun. These are not worn, and they don't have any significant type of markings on them that are going to lead me to believe that there's something odd going on in there. There's a little bit of mark, like little bit of marking right there, but not enough to warrant what I'm going to be showing you here soon.
Also, there wasn't any work done to the rail tabs and at least the slide lock was put in correctly. So let's move away from that because that's really the only thing I'm wanting to show you in there. Those outcroppings. And remember this one back, here because I'm trying to get a real good close up with that one. So you can see there's no real wear on it.
Okie doke. All right, so let's move to the guts of the gun. So first thing, you guys have to remember, this is a brand-new Gen 4 build. Number one, when I opened the gun up and I looked at the trigger bar, of course I noticed that it was, you know, it was a Gen 3 bar, no big deal. But the way this is cut right here is really, really pushing it when it comes to getting the correct depression of the safety plunger and that's actually showing. And I'm going to grab the Gen 3 bar here just so you can see. So this is the cut that I use right there. And you can see that's definitely enough of a scallop-out right there to do what you need this thing to do, especially if you're minimizing pre-travel.
08:08
So you see how this has all that surface area on the top. Okay, that’s what you need to actually depress the safety plunger. And this build, this bar that I have right here with mine, it's my combat. So it's matched with the flatness of the OEM, safety plunger. So these are going to interface perfectly. 100% without a doubt this is going to depress the safety plunger to give the firing pin, the proper amount of room and tolerance that it needs to push through the breach face past the safety firing pin, safety plunger.
Safety okay. So that's, I'm just showing you this. So you see actually how the margins pretty much work from my opinion. So now you have this cut, which is, as you can see, there's, it's not even as high as the highest point on this one.
It is cut past there to where the actual bar starts to take this downward movement right there. And so you can see it's, that's why it has that angle right there, up to where this thing is scalloped. Now, you know, what does that mean?
What that means is, and okay, so we're going to put that together with two things here. So this is the modified safety plunger. It's an OEM safety plunger. It's very telltale. You can tell the way it was probably chucked in a drill and you know, the bevel is taken off of it. So you can see the difference. All right.
Now with mine, I knocked the bevel down to be smooth. Like you can see right there, I mean you can see right here on this one, it doesn't have a line. It's just little bit rounded right there because I need that surface area on that to make sure I have 100% and you know, disengagement of the safety. And on this one you can see if I bring it up really close, hopefully we'll be able to, there we go. Okay, you can't see it online, but you can see the different surface areas right there perfectly.
10:38
So you have the size of that little dot in the middle right there. That's the only part that's not chamfered that's going to catch supposedly, catch this piece to depress the safety plunger. And I should have it upside down. But this piece is going to come across here. This is rough. This is going to come across here and push this up. Okay. So that's not what's happening at all. And the way you can tell that is by looking at this safety plunger. Let me get up here on the stool and come on. Oh, sorry about that you all. Looking at the safety plunger and you can see, and a lot of people don't realize this part, if it's messed up, it spins, spins a little bit anyway, but now I'm telling you this is a brand new Gen 4.
Okay. Brand new, 750 rounds is not going to take the nickel, start to take the nickel copper away. See how it's all moved. All disappeared from right there. Right on that shelf that I'm showing you. Hopefully you know what I'm talking about. As I'm spinning it, it’s all worn. The whole damn thing's worn away. Trying to get a little bit closer. Yeah, well not the very top here, but this shelf right here that I'm showing you. These are hard to keep a hold of.
12:07
So you have that and the reason you have that, there's another pretty good shot of it. The reason you have that is because this is not, let me see if I can...this does not have enough depression right here. When it comes back like that to push this up and out of the way enough to allow the safety. So the safety sits here, and this is fricking hard. Safety sits here. I need you to see that shelf. So when it gets pushed up, it's allowed to go through it via those two shelves. So maybe if I show you up here it'll make more sense.
No, I can't even get, okay. So when it gets pushed up, it's allowed to pass through there. But what it's doing instead is there is not enough clearance. So this part of the shelf right here, which is the top part, where do I get a pointer, this part of the shelf right in here, which is the top part, is smacking this and causing it to spin. So it smacks it.
So it's basically like it'll grab, it's going to, say this is the safety plunger right here. It grabs it and pushes it like this, and the safety plunger rolls. I should keep my finger stationary. It pushes it again, the safety plunger rolls, then it drags it back. So it's rubbing back and forth on the safety plunger. I hope you guys are following me. Leave some comments and I’ll explain if you want me to, but this is better, but this is what's happening. So it hits the shelf, it rotates, it hits the shelf, it rotates it. I'm really going to have to work on these camera angles. It'll be better for the digital download.
14:11
So anyway, this is a fuck up man. This is not, this is, okay. So here's another issue. No one, and this is what I was telling you if I was in court of law, no one is telling me this was the brand new out of his Gen 4, that this was the Striker, that was, that this was the firing pin that was in there. There is no way in hell with the wear on that, that this was indeed the firing pin that had only 700 rounds put through it.
All right, that just doesn't happen.
So it wouldn't be going out on a limb to say this, this is you know, reallocated or something like this. If it was, you know, you can reallocate Glock parts sometimes but not messed up Glock parts. That's a problem. And so that's number one. So if you look at the difference in a brand-new safety plunger, that's an OEM safety, plunger, I mean there's a huge fricking difference. Huge. And if there are only 750 rounds and through it, it would not even be close to, you know what this one is showing that was in this $2,000 build, number one.
Number two, let me grab the Gen 3 block. Okay, so we already discussed the you know the cut right here. Next is going to be the area that we're going to look at, which is right here. Let me get this little small thing here so I can, the next is going to be this area right here. That is one of those areas that is going to potentially rub off of this part of the polymer, which is right here. If there is an issue with the gun, you'll see some rubbing there.
16:17
Now it takes a lot of rounds to give you that information. Now this is the trigger bar that came with the gun and you can see that, right there, is not corresponding to what's inside this frame. Okay, so that is a lot of wear. That is, I mean, look at it.
It's scuffed, it's scraped, it's worn in an interesting way too. There's like a line cut through it right there if you can see that. All right, there we go. Sorry about all this glowing. That's number one. Okay. Number two, not bad if I look at the top of it. Let me just grab my rag here and polish and top this thing off.
Typically if it's a used bar that's been used for quite some time, you'll see and you can see it here and I just polished it, really polished it. You can see Striker drag on the top of the, you can see what's called striker drag on the top of the bar right there. So that demarcate, these marks right here. That line right there. See if I can't get it better, that's probably as best as I'm going to be able to get it. Maybe no, okay, Right there. There you go. Kind of looks like it's worn a bit.
18:01
That is the tail of the ttriker when the gun comes back like this, usually traveling on top of that, it'll happen. It'll travel a little bit on top of that angle that just, it's just a slide to frame thing, you know before it grabs the striker right here. So you can see that's there.
Next is, and this is the part that’s, so telltale. I haven't even polished this yet, but you see that line cut at an angle right there. I really want you guys to see this. So there is a complete and total line cut into that metal. Yeah, see it right there. It is a complete and total line cut into the metal. Not to mention I'm going to polish this. I'm going to just wipe this away right now to see what we have here, because I guarantee you it's going to, it's going to show us some more information. Oh, I don't want you to think I'm going to sell this. I'm going to just grab this and try to wear some of this away. Polish some of this away. I am not even polishing. I'm just wiping whatever the heck was on it off.
Okay, so along with that, wow, you can see those demarcations and some of the...I mean if it's even going through the plating in places right there, this bar is, let's put it this way, this is not a bar that has 750 rounds through it. There is no way in hell with these, with all these marcations right here. This is definitely not a bar that has 700 to 750 rounds through it. There's no way in hell. There is no way in hell. Okay, so that's another issue.
20:06
So we have a problem with the safety plunger in two areas. Problem with the safety plunger in two areas. We have a problem with the depression of the safety plunger, a chain causing two things as well. So if you look here at the, if you also look at the extractor, you can see that mark right there. That's another area because the extractor you know, captures this. Sometimes if it's not depressed, it's coming back and smacking that as well during cycling. And that also contributes to, you know, marring and problems you see with the safety plunger. So what do we got here? One, two, three, four, five, six issues going on just here so far. All right, now we won't say seven. We won't say seven on this because this, this is consequential to that. I mean this is consequential to this.
So now let's go to the connector. First of all, let me see if I can, I might, it's so loose I might be able to even get, yeah, look, see, so it fell out. I don't know I was looking down, so I don't know if I caught that on camera, but if I just go like this, that connector falls out. That is a huge problem. And why is it a huge problem? Because then that gives this connector the ability to move back and forth like so, which means it can grab here and snap. It can grab forward. Well it's not moving forward too much, but yeah, there you go. Just a little bit there. But back and forth like that is no good. That's just not what you want.
22:00
And you know, it's very unrefined. There's been no work done to it. It's just a you know, connector that's been...I'm trying to see if I could turn this other light off too if I have a switch here. Maybe we'll get a better lighting if I can. Let's see. Nope, kept the ones on I wanted off. Anyway so let me get back over here.
No, there's no switch there either. God damn it. Anyway, so let me grab a Gen 4 housing and then okay so here's a Glock stock connector, 5.5 pound connector, which I have to literally push in there. You can see there is no, as I'm moving this back and forth, there is no wobble. It's not going to grab in the back. It's not going to grab in the front. You can see the difference in these two, look.
It makes the whole connector move basically. And in order to get this connector out, I have to actually....